How to Connect Epson Printer to WiFi?
Epson printers are among the most popular printers because of their reliability and performance. However, setting up an Epson printer on a WiFi network can sometimes be a challenge. In this blog, we will show you how to connect Epson printer to WiFi using WPS. Whether your Epson has a display or not, you can find the appropriate connection method in this article.
Tips: Printer connected to WiFi + device connected to printer → Printing is successful.
How Do I Connect My Epson Printer to WiFi?
To connect to Epson printer WiFi, you can use Wi-Fi Setup Wizard, Wi-Fi Direct or Push Button Setup (WPS). Let’s focus on Push Button Setup (WPS), which is one of the quickest ways to connect your printer to WiFi. The specific steps vary depending on whether your printer has a display.
1. What is “Push Button Setup (WPS)”?
“Push Button Setup (WPS)” is a WiFi Protected Setup (WPS) method that enables devices to connect to a wireless network without manually entering a password. To use it, simply press the WPS button on the router and then activate the WPS function on your device within two minutes. The device will automatically establish a connection with the router.
Where is the WPS button on my router? The WPS button is usually located on the front, back, or side of your router. It’s often labeled “WPS” and may have an icon that resembles two arrows in a circle or a padlock with WiFi waves. If you can’t find it, check your router’s manual or look for a small button that you may need to press firmly.
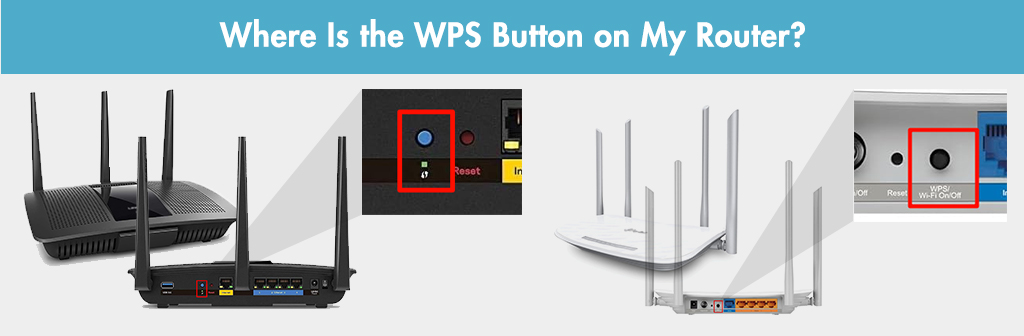
As for the WPS function of a device such as a printer, it depends on its own design, which is usually located in the network settings section.
2. For Epson Models Without Display
How to connect Epson printer to WiFi without screen? Following the steps below will make it easy for you.
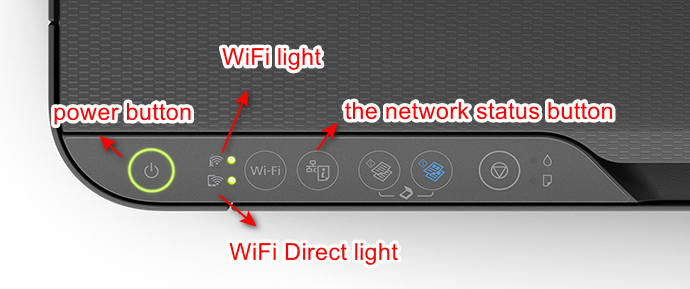
(1) Reset the printer’s WiFi settings:
Press and hold the “network status” button and the “power” button simultaneously until the WiFi and WiFi Direct lights blink alternately, then release. When both lights turn off, you have reset the WiFi.
This will reset the network settings on most Epson printers without a display. If this fails, check your printer manual.
(2) Connect the printer to WiFi:
Press and hold the WPS button on your router until the WPS light flashes.
Then, press and hold the “Wi-Fi” button on your printer for 5-6 seconds until the WiFi and WiFi Direct lights start flashing.
When the WiFi light turns green, it means your printer has successfully connected to WiFi.
Common printers include Epson Artisan 1430, Epson EcoTank ET-2400, Epson EcoTank L3150, Epson EcoTank L3250, Epson Expression Home XP-2150, Epson Expression Home XP-235, and Epson L3251.
3. For Epson Models with Display

(1) Reset your printer’s network settings (if needed):
First, in order to successfully connect your Epson printer to WiFi, it is best to reset the printer’s network settings or restore the printer to factory settings. Read the blog How to Reset Epson Printer to learn how to restore factory settings.
Typically, you can reset your Epson printer by selecting “Settings,” clicking “Restore Default Settings,” and then selecting “Network Settings” or “Clear All Data and Settings.”
(2) Press the WPS button on your router until the indicator light flashes:
Next, press and hold the WPS button on the router and release it after the indicator light flashes or lights up.
(3) Select the WPS option on the Epson printer within two minutes:
Finally, you need to select the WPS option on your Epson printer within 2 minutes. Different printer operations may be different, please find your model below and perform the operation.
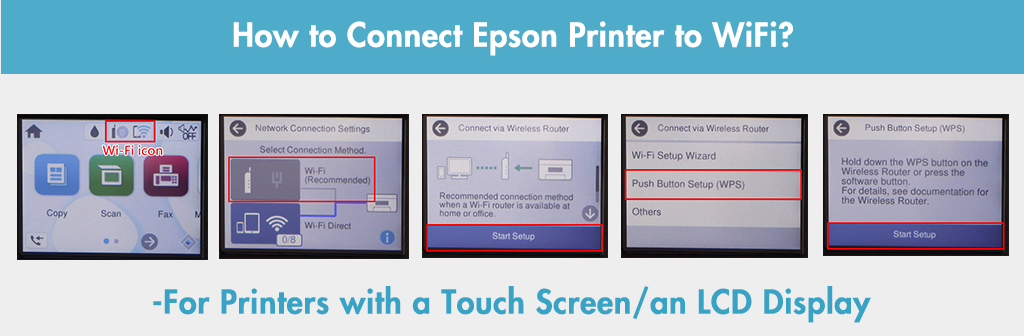
For Printers with a Touch Screen:
① Wi-Fi icon at the top > “Wi-Fi (Recommended)” > “Start Setup” > “Push Button Setup (WPS)” > Follow the prompts.
Example: Epson EcoTank ET-15000, Epson EcoTank ET-4760, Epson EcoTank ET-4850, Epson EcoTank Photo ET-8500, Epson EcoTank Photo ET-8550, Epson EcoTank Pro ET-16600, Epson EcoTank Pro ET-16650, Epson EcoTank Pro ET-5150, Epson EcoTank Pro ET-5170, Epson Expression Home XP-4205, Epson Expression Home XP-5100, Epson WorkForce ET-4750, Epson WorkForce WF-2860, Epson WorkForce WF-2960.
② Wi-Fi icon at the top > “Wi-Fi (Recommend)” > “Push Button Setup (WPS)” > Follow the prompts.
Example: Epson WorkForce Pro WF-3820, Epson WorkForce Pro WF-3823, Epson WorkForce Pro WF-4720, Epson WorkForce Pro WF-4730, Epson WorkForce Pro WF-4740, Epson WorkForce Pro WF-4820, Epson WorkForce Pro WF-4830, Epson WorkForce Pro WF-4833, Epson WorkForce Pro WF-4834, Epson WorkForce Pro WF-7820, Epson WorkForce Pro WF-7840.
③ Wi-Fi icon at the top > “Router” > “Start Setup” > “Push Button Setup (WPS)” > Follow the prompts.
Example: Epson EcoTank Pro ET-5800, Epson EcoTank Pro ET-5850, Epson EcoTank Pro ET-5880.
④ “Setup” > “Network Settings” > “Wi-Fi Setup” > “Push Button Setup (WPS)” > Follow the prompts.
Example: Epson Expression Premium XP-830.
⑤ Wi-Fi icon in the upper right corner > “Wi-Fi Setup” > “Push Button Setup (WPS)” > Follow the prompts.
Example: Epson WorkForce WF-7620.
For Printers with an LCD Display:
① “Wi-Fi Setup” > “Push Button Setup (WPS)” > Follow the prompts.
Example: Epson EcoTank ET-2720, Epson EcoTank ET-2800, Epson EcoTank ET-2803, Epson EcoTank ET-4700, Epson EcoTank ET-4800, Epson Expression ET-2550, Epson Expression Home XP-420, Epson Expression Premium XP-630, Epson WorkForce WF-3520, Epson WorkForce WF-3530, Epson WorkForce WF-3640.
② Select the Wi-Fi icon at the top > “Wi-Fi (Recommend)” > “Start Setup” > “Push Button Setup (WPS)” > Follow the prompts.
Example: Epson EcoTank ET-3760, Epson EcoTank ET-3830, Epson EcoTank ET-3850, Epson Expression Home XP-4100, Epson Expression Home XP-4105, Epson Expression Home XP-4200, Epson Expression Home XP-5200, Epson Expression Premium XP-7100, Epson WorkForce ET-3750, Epson WorkForce WF-2850, Epson WorkForce WF-2950.
③ Select the Wi-Fi icon at the top > “Router”> “Start Setup” > “Push Button Setup (WPS)” > Follow the prompts.
Example: Epson WorkForce Pro WF-7310.
④ “Settings” >”Network Settings” >”Wi-Fi Setup” > “Push Button Setup (WPS)” > Follow the prompts.
Example: Epson EcoTank ET-2760, Epson Expression ET-2750, Epson Expression Premium XP-640.
⑤ “Settings” >”Network Settings” >”Wi-Fi Setup” > “Wi-Fi (Recommend)” > “Push Button Setup (WPS)” > Follow the prompts.
Example: Epson EcoTank ET-2850.
⑥ “Wi-Fi Setup” > “Wi-Fi (Recommend)” > “Push Button Setup (WPS)” > Follow the prompts.
Example: Epson Expression Premium XP-540, Epson WorkForce WF-2830, Epson WorkForce WF-2930.
⑦ “Setup” button > “Wi-Fi/Network Settings”> “Wi-Fi Setup” > “Push Button Setup (WPS)” > Follow the prompts.
Example: Epson WorkForce WF-7510, Epson WorkForce WF-7520.
After Successfully Connecting to WiFi
Once your Epson printer is connected to WiFi, you can link it to your computer or mobile device to start printing (your device and printer should be on the same network).
1. How to Connect Epson Printer to Computer/Laptop?
For Windows Users:
Go to “Settings,” find “Printers & scanners,” and click “Add a printer or scanner.” The computer will start searching for available devices nearby and select “Add device” to add your Epson printer.
Taking Epson EcoTank L3150 as an example, this video details how to connect the printer to WiFi via the WPS option and add the printer to your computer.
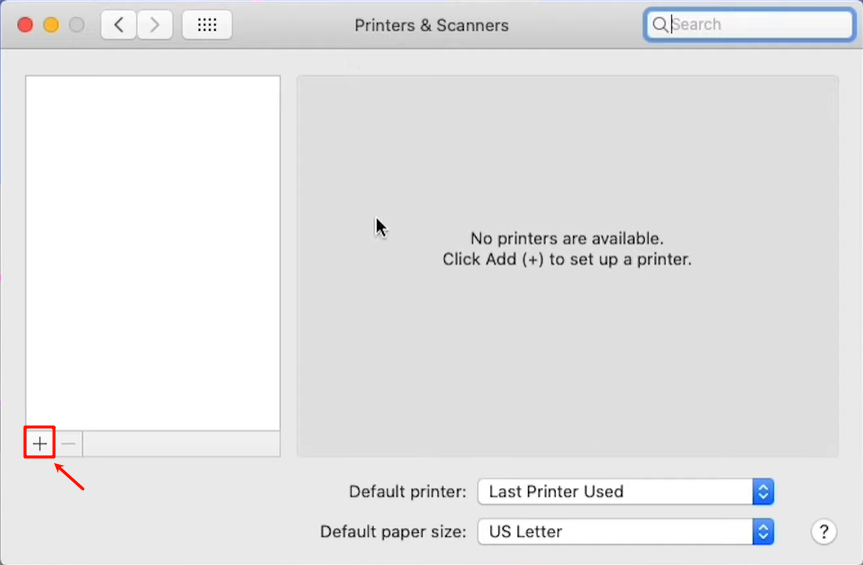
For Mac Users:
Open “System Preferences,” find “Printers & Scanners,” and click “+.” Your Mac will begin searching for available nearby devices. Click on your Epson printer and select “Add” to add it.
2. How to Connect Epson Printer to WiFi with Phone?
For mobile phone users, you can use the Epson iPrint app (for older models) or the Epson Smart Panel app (for newer models).
(1) Download and install the Epson iPrint or Epson Smart Panel app.
How do I know which app to choose? See the Epson Smart Panel App page, which lists the Epson models it supports. If you don’t find your printer model there, use Epson iPrint.
(2) Assume that you are using an Epson Smart Panel. Open the application and tap the “+” button to add a new printer. Next, select “Set up a New Product.”
(3) Next, a dialog page will open. Follow the instructions to add your Epson printer and set up WiFi, then you can print.

The video below shows you how to connect your phone to an Epson printer.
Quick Summary
To sum up the above, let’s quickly summarize how to make your Epson printer print successfully:
Printer connected to WiFi + device connected to printer → Printing is successful.
Press and hold the WPS button on the router for a few seconds until the light flashes, then initiate the WPS option on the Epson printer within 2 minutes. Wait for the WiFi light on the printer to stop flashing and remain steady, indicating a successful connection. Once connected, add the Epson printer to your computer or mobile device, and you can start printing.
Frequently Asked Questions About Epson Printer WiFi Connection
1. How Do I Reset My Epson Printer to a New Wi-Fi?
As mentioned above, there are two ways to reset the WiFi settings of Epson printers.
For Epson printers without a display on the control panel:
- Reset the WiFi first: Press and hold the “network status” button and the “power” button until both WiFi lights flash, then wait for both lights to turn off.
- Then, press and hold the WiFi button for 5-6 seconds to add a new WiFi.
For Epson printers with a display on the control panel:
- Reset the WiFi first through “Settings” > “Restore Default Settings” > “Clear All Data and Settings.”
- Then, return to the home screen, choose the “WiFi” icon, and then select “Push Button Setup (WPS).”
- Finally, follow the instructions to add a new WiFi.
2. Why Is My Epson Not Connecting to the Wi–Fi?
First, reset the WiFi settings on your printer as described above and try to reconnect.
If your printer still refuses to connect, see if these can help you quickly fix it.
- Check your WiFi password: Make sure you entered it correctly.
- Restart your router and printer: Restarting can often fix temporary connection problems.
- Move closer to the router: Move the printer closer to the router, as a weak signal can cause disconnection.
Wrap It Up
By following the correct steps, you will be able to connect your Epson printer to WiFi successfully. When you encounter any problems, try factory resetting your printer and connecting to WiFi again. If you still can’t connect wirelessly, using a USB cable for a wired connection is a good option.
Discover more blogs you may enjoy: How to Check Ink Levels on HP Printer?