Why Is My Epson Printer Printing Lines?
This situation happens without warning: you print an important report or a cherished photo, only to find faint or bold lines running across the page, ruining the printout. Everyone can relate to this frustration. Why is my Epson printer printing lines? This is a common print quality problem with Epson printers, and it’s usually fixable. This guide explains the reasons why this happens and provides detailed step-by-step instructions for fixing it.
Table of Contents
I. Why Is My Epson Printer Printing Lines?
Epson inkjet printers create images and text by precisely spraying tiny ink droplets onto the paper through hundreds of tiny nozzles on the print head. When your printer starts producing lines, streaks, or bands, it’s a clear indication that this precise printing process is being disrupted. There are several reasons for this disruption:
- Clogged Nozzles: This is the main reason. Dried ink clogs the nozzles, resulting in missing lines.
- Misalignment: The print head is misaligned, leading to blurry or ghosted lines.
- Dirty Encoder Strip: A dirty optical encoder strip can misguide the print head’s horizontal movement.
- Incorrect Settings: Using “high-speed” mode or the wrong paper type can cause printing problems.
- Low Ink or Faulty Cartridges: Insufficient ink can cause air bubbles, resulting in very faint printing or streaks.
II. What the Lines Are Telling You?
Your faulty printout is a diagnostic sheet. Examine it carefully:
Horizontal Lines or Gaps: If you see white horizontal streaks or bands where ink is missing, this almost always indicates a clogged print head nozzle. The ink has dried inside the nozzle, blocking the ink flow.
Vertical Lines or Smears: Consistent vertical streaks or blurry lines usually indicate a dirty encoder strip or a printhead calibration problem. The encoder strip is a clear, plastic ribbon with fine lines that tells the print head exactly where it is horizontally. If it gets dirty, your printer loses positional accuracy.
Lines of a Specific Color: Are the lines only cyan, magenta, yellow, or is the black text streaky? If only cyan is streaked, then only that ink channel is clogged.
Repeating Blobs or Marks in the Same Spot: If a smudge or line appears at identical intervals down the page, this suggests a physical problem. For example, there may be a speck of debris on a roller, or a damaged roller/wiper blade that touches the paper or print head at the same point every revolution.
III. How to Fix Epson Printer Printing Lines?
From simple software checks to physical maintenance, the following steps apply to most Epson printers. After completing each step, perform a test print to verify if the lines have disappeared.
Step 1: Check Warranty Status
Before you begin, please check the warranty status of your printer on the Epson website: https://epson.com/w/warranty. If your printer is still under warranty, please contact Epson customer support first, as attempting repairs yourself may void the warranty.
Next, ensure your computer/phone is connected to the printer.
- Windows: Go to “Settings,” “Bluetooth & devices,” “Printers & scanners,” and ensure your Epson printer is listed and “Set as default.”
- Mac: Go to “System Preferences,” “Printers & Scanners,” and confirm that your Epson printer model is present and its status is “Idle.”
Step 2: The Basic Checks
1. Check Ink Levels & Cartridges
First, check the ink levels for all colors on your device by accessing your Epson printer utility/application/printer screen. For Epson EcoTank printers, check the ink tanks. See more in How To Check Ink Levels On Epson Printer.
Low or empty ink cartridges (even if printing is still barely possible) can cause air bubbles to enter and cause streaking. When ink is low, refill or replace the cartridges. See more in How To Install Ink Cartridge In Epson Printer.
2. Verify Paper Type & Quality Settings
Next, please verify your paper type and quality settings. Mismatched settings can lead to poor ink absorption and blurry prints.
- Open your document and press “Ctrl+P” (Windows) or “Cmd+P” (Mac) to open the print dialog box. Select your Epson printer from the list.
- Click “Properties,” navigate to the “Paper” or “Main” tab, find “Paper Type,” and select the option that matches the type of paper you’ve loaded. For example, “Epson Premium Glossy Photo Paper,” “Plain Paper,” or “Matte Paper – Heavyweight.” If you don’t know the specific type, select “Premium Presentation Paper Matte.”
- In the same window, find the “Print Quality” settings. Move the slider or select options such as “Normal” or “Best Photo.”
- Print a test page to see if the lines or streaks have disappeared. Refer to the blog How Do I Print a Test Page on HP Printer for details.
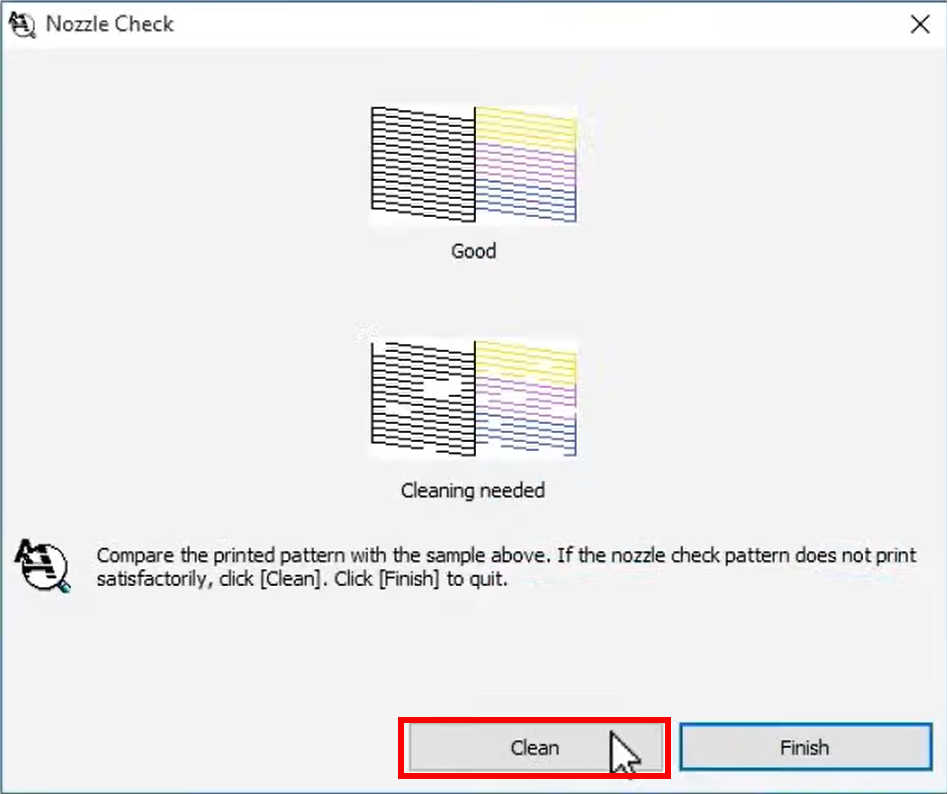
Step 3. Run a Nozzle Check
If the problem persists, it’s most likely due to a clogged print head. We need to run a nozzle check to proceed with further cleaning.
On Windows 10/11: Open “Control Panel,” go to “Devices and Printers,” right-click on your Epson printer, and select “Printing Preferences.” Click the “Maintenance” tab and select “Nozzle Check.”
On macOS: Open “System Preferences,” click “Printers & Scanners,” and select your Epson printer from the list on the left. Click “Options & Supplies…,” select “Utility,” and then select “Nozzle Check.”
Follow the on-screen instructions. The resulting pattern will clearly show if there are any clogged nozzles, indicated by broken lines or missing color blocks. The blog post How to Run a Nozzle Check on Epson Printer provides details. Then, you will proceed with cleaning the print head (next step).
Step 4: Printhead Cleaning & Adjustment
If the nozzle check shows broken lines, you will be prompted to run the printer’s built-in cleaning procedure.
- Click “Clean” or “Print Head Cleaning”. Your Epson printer will start cleaning automatically, which takes about one minute.
- After cleaning is complete, run the nozzle check again to verify the results. Do not run this standard cleaning more than twice consecutively, as this will waste ink.
- If two standard cleanings are ineffective, you may need “Deep Cleaning”. In the “Maintenance” or “Utilities” tab, go to “Advanced Settings” or a gear icon. Select the “Deep Cleaning” or “Powerful Cleaning” option. Note that deep cleaning consumes a significant amount of ink, so make sure your printer has enough ink.
Also, please re-check your print settings to optimize output. In the “Printing Preferences” window, look for “High-Speed Printing” and make sure it is not selected, as this mode sacrifices accuracy for speed.
Step 5: Print Settings Calibration
If lines still appear after a successful nozzle check, it means the ink is flowing correctly, but the printing position is inaccurate. Therefore, you need to calibrate something.
In the “Maintenance” or “Utilities” tab, click “Print Head Alignment.” Your Epson will print a sheet of paper with numbered patterns. Instructions will appear on the screen; enter the pattern numbers that look the straightest and clearest. This corrects print head misalignment that causes blurry text or unclear color edges.
If horizontal streaks persist on specific photo paper or specialty paper, you can use a more precise tool: Print Quality Adjustment.
Return to the “Maintenance” or “Utilities” tab, select “Print Quality Adjustment” or “Manual Printer Alignment.” Select the exact paper type from the detailed list and follow the on-screen instructions, which usually involve printing patterns. If you are using an all-in-one model, you may also need to scan the patterns to fine-tune ink ejection for the specific media.
Step 6: Manual Print Head Cleaning
When all settings fail, especially when persistent vertical lines are present, it is advisable to check the encoder bar and code and manually clean the printhead. Always turn off and unplug the printer first.
1. Check If the Encoder Strip Is Dirty
The encoder strip is a thin, clear plastic film with tiny markings. The optical sensor on the printhead reads these markings to determine its precise horizontal position. If this strip gets dirty with dust or ink mist, the sensor will misread its position, leading to vertical lines, blurring, or color misalignment.
- Open the cover of your Epson printer. Behind where the print head carriage moves, you will see a thin, clear plastic strip running from left to right.
- Moisten a lint-free cloth or cotton swab with distilled water (never use alcohol or tap water). Gently pinch the strip and wipe along its length. Use a dry part of the cloth to dry it completely.
This video shows you the location and appearance of the Epson printer encoder strip:
2. Manually Clean the Print Head
Prepare a cleaning kit containing a syringe, tubing, and cleaning solution.
With your Epson model off and unplugged, move the print head carriage to the center position.
① Place some paper towels under the print head. Then, remove the top plastic cover of the print head, and gently pinch and move the ink cartridges aside (remember the color positions). Now you can see the print head.

② Attach the tubing to the syringe and draw up the cleaning solution. Then attach the tubing to the nozzle you want to clean (you already know which color has a problem from “Step 3. Run a Nozzle Check“).
③ Press the syringe plunger to slowly push out 5 ml of cleaning solution, then remove the tubing. Then remove the paper towel soaked with liquid. Reinsert a new paper towel and push out the cleaning solution again to clean all the problematic nozzles.
④ Then, wipe away all water stains, put the ink cartridge and top plastic cover back in, and finally close the printer cover.
⑤ Wait 24 hours to ensure the printer components are dry. Turn your printer back on and perform a nozzle check to see if the print quality has improved.
Watch the video for detailed instructions on manually cleaning an Epson print head.
Step 7: Assess Hardware and Seek Help
If all the above steps fail to resolve the problem, you likely have a hardware malfunction. At this point, professional repair services are needed, which means you may have to pay a fee.
Repair costs can be high, sometimes even comparable to the price of a new printer. Therefore, buying a new printer might be a wiser and more economical long-term solution. If you decide to consider new options, these blog posts might give you some purchasing inspiration:
- Canon PIXMA vs Epson EcoTank, What’s the Difference?
- Canon PIXMA vs HP DeskJet: What’s the Difference?
- DeskJet vs InkJet vs LaserJet: What Are the Differences?
- HP Envy vs OfficeJet: What’s the Difference?
- Thermal Printer vs Inkjet Printer, Which Is Better?
IV. Why Is My Printer Printing in Streaks When the Ink Is Full?
A full ink cartridge doesn’t guarantee clear prints. The problem is never the ink in the tank, but the ink in the print head nozzles. Even if the ink is full, when your Epson printer is not used for a long time, the ink in the microscopic nozzles can dry out, causing clog. New ink cannot pass through this blockage.
This is why we perform a “Nozzle Check,” which helps you determine if there is an ink clog. To resolve this issue, follow Step 3 and 4 above to perform a nozzle check, and then follow the prompts to clean the printhead, or even manually clean the printhead if necessary.
V. Conclusion
Solving the problem of “Why is my Epson printer printing lines?” almost always follows a systematic process. From checking consumables and adjusting settings to running a nozzle check and performing targeted cleaning, you can quickly resolve this type of issue.