How to Change Ink on Canon PIXMA?
Canon PIXMA printers are widely recognized for their user-friendly features and high-quality prints. However, how to change ink on Canon PIXMA printers can sometimes be tricky, especially for users who are unfamiliar with the process. In this blog, we will walk you through each step and address common troubleshooting issues.
How to Change Ink Cartridge on Canon PIXMA?
Replacing the ink on your Canon PIXMA printer requires a few simple steps, but some steps vary for your specific printer model.
1. Open the Printer Cover
To remove the ink cartridges, first plug in the power cord and turn on the printer. Once powered on, open the front cover, top cover, or both, depending on your Canon PIXMA model.
Usually open the front of the printer cover. After opening 1-3 covers you will see the inside of the printer. In some models, such as the Canon PIXMA MX922, you may need to open both the front cover and the top cover to access the ink cartridges.
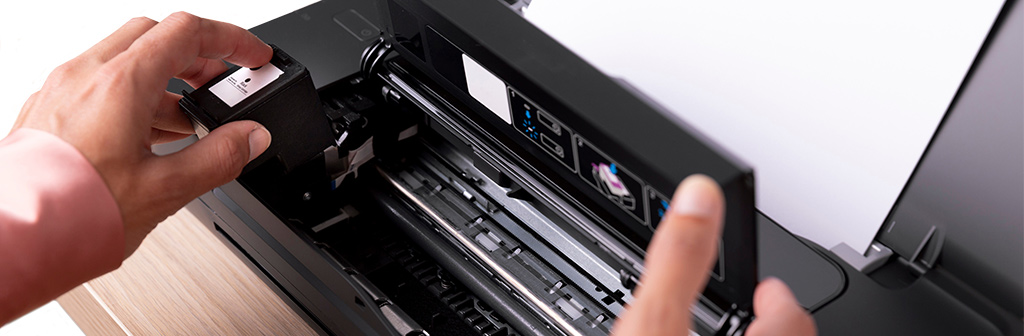
2. Remove the Ink Cartridge
After lifting the covers, the cartridge holder will typically slide into a visible position. For example, on the Canon PIXMA MG3620, the holder will move to the right. Wait until the cartridge holder stops moving before trying to remove the cartridge.
Next, push down on the cartridge to release it from the slot. In some printers with a locking lever or locking cover, you need to push the lever down or lift the cover to release the ink cartridge. If your printer uses cartridges with tabs, such as the Canon PIXMA PRO-100, press the tab and remove the ink cartridge from the slot.
Printers with Ink Cartridge Locking Levers or Locking Covers:
Canon PIXMA MG3520; Canon PIXMA MG3620; Canon PIXMA MP495; Canon PIXMA TS3522; Canon PIXMA TS5320; Canon PIXMA TS5350; Canon PIXMA TS6420a.
Printers That Can Directly Remove Ink Cartridges:
Canon PIXMA MG2922, Canon PIXMA MG2460, Canon PIXMA MG2500, Canon PIXMA MG2520, Canon PIXMA MG2522, Canon PIXMA MG2560, Canon PIXMA MG2920, Canon PIXMA MG2924, Canon PIXMA MG3022, Canon PIXMA MG3050, Canon PIXMA MX490, Canon PIXMA MX492, Canon PIXMA MX922, Canon PIXMA TR4500, Canon PIXMA TR4520, Canon PIXMA TS3122.
3. Prepare a New Ink Cartridge
After unpacking, carefully remove the protective tape from the new PIXMA ink cartridge, being careful not to touch the metal contacts or nozzles. If there is an orange protective cover on the ink cartridge, remove it as well. This step ensures that your Canon ink cartridge is properly connected to the printer and that no contaminants will interfere with print quality.
4. Install into the Printer
Hold the ink cartridge with its metal contacts toward the printer, and insert it into the corresponding color slot. Gently push the ink cartridge until you hear a click, indicating that the PIXMA ink cartridge is firmly seated.
For Canon PIXMA printers with a locking lever, push the locking lever up to lock it. If your printer has a locking cover, put it firmly on the ink cartridge.
5. Close the Printer Cover
Finally, close the front cover and top cover (if applicable). After installation, the Canon PIXMA printer’s lights should stop flashing, indicating that your printer is ready for use. If there were any ink warnings before, they should disappear, confirming that the ink cartridges are installed correctly.
For general cartridge installation, watch this video for a clearer idea.
For cartridges with locking covers, this video provides clear instructions.
Adjusting the Print Head After Installation
After replacing the Canon PIXMA ink cartridge, we need to align the print head. This process ensures that the print head is properly aligned with the paper, helping the printer maintain optimal print quality.
1. For Printers with Digital Code Displays: Canon PIXMA TS3522
- First, turn on your Canon PIXMA printer and load paper into the paper tray.
- Press the “Setup” button until the number “4” appears on the LCD screen.
- Press the “Black” or “Color” button, the printer will print an alignment sheet.
- Place the alignment sheet face down on the scanner glass, making sure it is positioned to match the alignment mark on the upper left corner.
- Then, gently close the cover and press the “Black” or “Color” button. Your printer will automatically scan and adjust the print head.
- Once the ON light stops flashing and remains on, the print head alignment is complete.
2. For Printers Without Display Screens: Canon PIXMA MG2522
- Turn on your Canon printer and load paper.
- Press and hold the “Stop” button until the alarm light flashes orange 4 times, then release the button to get the alignment sheet.
- Place the alignment sheet on the scanner glass and align it according to the mark on the lower right corner.
- Close the cover and press the “Color” or “Black” button to start scanning. The printer will automatically adjust the print head alignment and the process will be completed in a few minutes.
3. For Printers with Text Display Screens: Canon PIXMA TS5320
- Turn on the Canon printer and load paper, then press the OK button.
- Select “Maintenance” from the menu, then “Print Head Alignment – Auto.”
- Press OK again to confirm and print the alignment table.
- After the alignment sheet is printed, the printer will automatically perform the alignment, which will take about 4-5 minutes.
- Once finished, press OK to complete the process.

FAQs on How to Change Ink on Canon PIXMA Printer
Let’s move on to some of the common questions regarding Canon PIXMA printer ink cartridge replacement.
1. The Canon PIXMA Printer Says Ink is Low, But My Old Cartridges Aren’t Empty. What Should I Do?
If you receive a low ink warning but still have ink, you can temporarily disable the ink level detection feature:
Press and hold the “Stop” button on your Canon PIXMA printer for at least 5 seconds, then release it.
You can continue to use the old ink cartridge until it is completely depleted, allowing you to make the most of your ink supply.
2. How Do I Know When the Ink is Out?
You can check the remaining ink levels on your Canon PIXMA printer using these methods.
- Using the Canon printer software, check the ink levels by navigating to the “Ink Status” or “Maintenance” tab.
- Error Message: The printer may display an “E13” error message on its screen or in a pop-up notification.
- Ink indicator lights: The color or black ink indicator lights on the printer will light up to indicate that the ink level is low or empty.
Each of these indicators is a helpful reminder to let you know when it is time to replace the ink.
3. How Do I Know What Ink Model I Need?
To determine your Canon PIXMA compatible ink cartridge model, look for the model number printed on your current ink cartridge or refer to your printer manual. Alternatively, you can search your printer model online and find compatible inks on the official Canon website or any reputable printing supplies website.
4. How to Check the Ink Status of My Canon PIXMA Printer?
Checking the ink status is helpful when you want to confirm the ink level after replacement or during normal use.
- For Windows Users: Open the printer driver setup window and start the Canon IJ Status Monitor. Click the Maintenance tab and select “View Printer Status”.
- For Mac Users: Open the pop-up menu of the print dialog box and select “Supply Levels”. Alternatively, click “Ink Level Information” on the Canon IJ Printer Utility page.
- For printers with Text Display: Press OK and select “Estimate Ink Levels” on your PIXMA printer.
5. What to Do If “Cartridge Communication Error” Appears?
If you experience a cartridge communication error, reinstall the cartridge and inspect for any visible physical damage. Read the blog How to Fix Canon Cartridge Communication Error to learn more.
Conclusion
Replacing the ink in your Canon PIXMA printer is a simple task once you know the basic steps. Whether you are a beginner or an experienced user, the process only takes a few minutes to complete. By following this guide and resolving common issues, you will be ready to keep your Canon PIXMA printer in top condition, ensuring high-quality prints every time you use it.
Keep Exploring: More Blogs to Dive Into