How to Change Paper Size on HP Printer?
Making sure your HP printer uses the correct paper size is critical to printing properly formatted documents, photos, and labels. Whether you need to convert a standard Letter size to A4 size to print an international document, use Legal-size paper for a contract, or set up a custom size for a special project, adjusting your printer’s paper size settings can help avoid misaligned prints and paper jams. This blog walks you through how to change the paper size on your HP printer—from the printer’s control panel, from your computer, and using the convenient HP Smart .
Method 1: Changing Paper Size Using the HP Printer Control Panel
Many HP printers allow you to adjust the paper size settings directly from the built-in control panel. This method is particularly useful when you want to make changes without using a computer. The process may differ slightly depending on whether your printer has a touchscreen interface or physical buttons.
First, make sure your printer is powered on and ready to go.
Locate the control panel – newer models are usually touchscreen, while older printers may have both physical buttons and an LCD screen.
For touchscreen models, look for the Setup or Settings menu and navigate to Paper Handling, where you’ll find the Paper Size option. If your printer uses physical buttons, use the arrow keys to scroll through the menu until you find Paper Setup.
Once you’ve accessed the paper size settings, you’ll see a variety of standard options to choose from.
Common options include Letter (8.5 x 11 inches), A4 (210 x 297 mm), and Legal (8.5 x 14 inches).
Some advanced models may also offer custom size options for special printing needs.
Once you’ve selected the desired paper size, confirm your selection – some printers apply the changes immediately, while others may require you to save settings or restart the printer.
For printers with multiple paper trays, confirm that each tray is configured for the correct paper size. This ensures seamless printing when switching between different paper types without having to manually adjust the settings each time.
Method 2: Adjusting Paper Size Through Computer Settings (Windows/Mac)
When printing from a computer, you can easily modify the paper size setting directly in the Print dialog box before sending the job to the printer. This method works in most applications, including Microsoft Word, PDF readers, photo editing software, and web browsers.
First, open the document or image you want to print and access the Print dialog box.
On Windows systems, this is usually done by pressing Ctrl+P, while Mac users press Command+P.
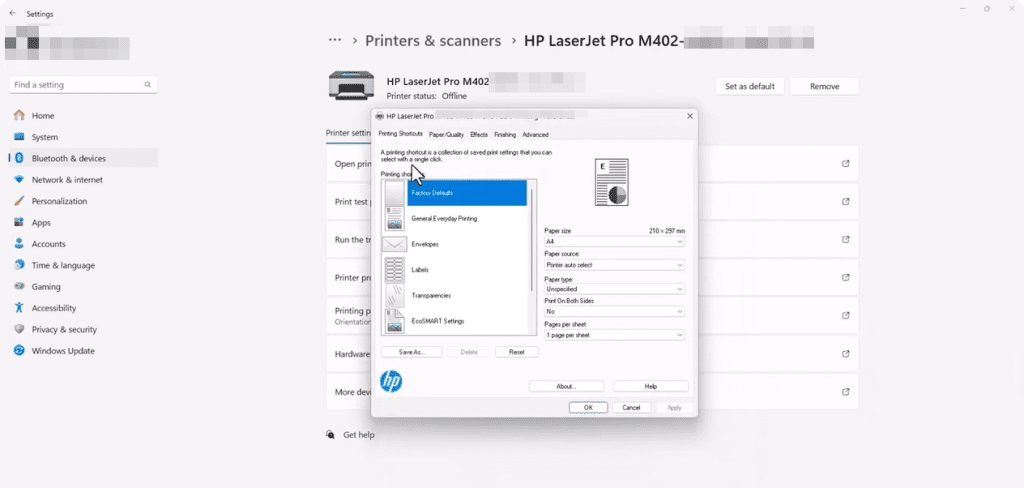
In the Print dialog box, first make sure your HP printer model is selected from the available devices. Find and click the Preferences or Printer Properties button. This may vary depending on your operating system and application.
In the Printer Preferences window, find the Paper/Quality or Page Setup tab, which contains the Paper Size option.
Here, you’ll find a drop-down menu with a variety of standard paper sizes. Select the size that matches the paper loaded in the printer.
Advanced users can sometimes customize the paper size if a project requires a non-standard size. Some applications, such as Microsoft Word, offer additional paper size controls in their own Page Setup menu, providing more precise layout options.
Before finalizing your print job, take advantage of the Print Preview feature. This feature lets you visually confirm that your document will print correctly on the selected paper size.
Once you’re satisfied with the settings, click the Print button to send the job to the printer. Keep in mind that some applications (especially web browsers) can override some settings, so always double-check before printing important documents.
Method 3: Configuring Default Paper Size Using the HP Smart App
For those who frequently need to change paper sizes or want to manage printer settings remotely, the HP Smart App is a great solution. Available for Windows, Mac, iOS, and Android devices, this free app lets you set default paper sizes and manage various printer features from your smartphone or computer.
First, download the HP Smart App from the official HP website or your device’s app store.
Once installed, open the app and sign in with your HP account credentials.
If you haven’t added your printer to the app yet, follow the on-screen instructions to connect your HP printer model to the app.
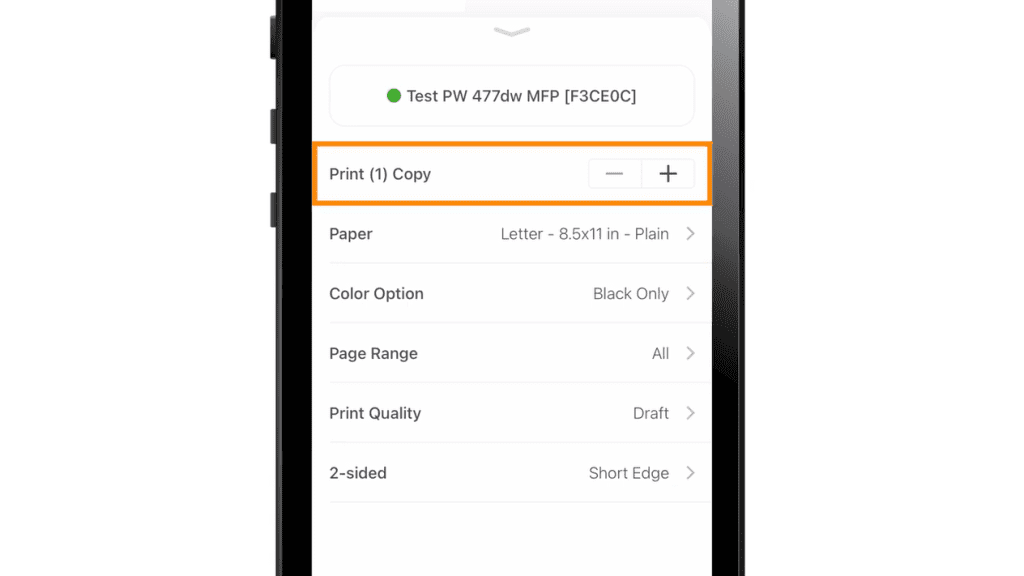
Once connected, select your printer from the app’s dashboard to access its settings.
In the Printer Management section, navigate to Printer Settings or Printing Preferences, where you’ll find paper handling options.
Find the Paper Size setting, where you can select a standard size or, if your printer supports it, define a custom size.
Setting a default paper size here ensures that your printer automatically uses your preferred size for subsequent print jobs, saving you time on repeated adjustments.
Troubleshooting Common Paper Size Issues
Even after changing settings, you might encounter problems. Here’s how to fix them:
1. Printer Not Recognizing Paper Size
- Check the paper tray – Ensure the physical paper guides are adjusted to fit the sheet size.
- Reload paper – Remove and reinsert the paper to help the printer detect it.
- Update firmware – Go to HP Support, enter your model, and download the latest drivers.
2. Incorrect Margins or Cropping
- Verify software settings – Some programs (like Adobe Reader) have their own scaling options.
- Reset defaults – In your printer settings, choose Restore Defaults to clear any misconfigurations.
3. Paper Size Option Grayed Out
- Check driver compatibility – Reinstall the printer driver from HP’s official website.
- Try a different app – If Word won’t let you change size, test with Notepad or another program.
4. Custom Size Not Working
- Ensure your printer supports it – Not all HP models allow custom dimensions.
- Enter exact measurements – Some printers require millimeter precision.
Final Thoughts
Knowing your HP printer’s paper size settings ensures professional-grade results for all your printing needs. Whether you use the physical control panel for quick adjustments, the print dialog box on your computer for fine-tuned adjustments, or prefer the convenience of remote management with the HP Smart App, knowing these methods will give you full control over your printouts.
More Blogs You’ll Enjoy Reading