Why My Epson Printer Won’t Print?
Whether it’s for a work project or personal use, it can be extremely frustrating when your Epson printer won’t print. While it might seem like a serious malfunction at first glance, most of the time the problem boils down to relatively simple issues that can be resolved with basic troubleshooting. In this blog, we’ve detailed the common reasons why your Epson printer won’t print and provided a step-by-step troubleshooting guide.
I.Quick Solutions for Epson Printer Not Printing
Many readers want to resolve issues immediately without reading lengthy explanations. This section exists to provide those urgent solutions.
- Make sure your Epson printer is turned on.
- Check Ink Levels: If the ink level is low or empty, replace it with new ink.
- Clean Printhead Nozzles: Run the cleaning utility on your printer or computer to check for this issue: “Maintenance” > “Nozzle Check” > “Head Cleaning.”
- Check Paper: Make sure the paper tray is loaded correctly and there are no jams.
- Verify Connection: Make sure your printer is properly connected via Wi-Fi, USB, or network. If not, check your printer’s manual and search for “Wi-Fi or Wired Networking” or “Wi-Fi Networking” to connect.
- Select Correct Printer: Confirm your computer or device is sending print jobs to the correct Epson printer and not another device.
- Clear Print Queue: Cancel pending jobs and try again: On Windows, find your printer, click “See what’s printing,” and then click “Cancel.” On Mac, select your printer, and then click “Open Print Queue” to cancel the print job.
- Update Drivers: Outdated or corrupted drivers can cause print failures. Install the latest driver from the Epson official website and try printing again.
- Reset Printer: Restarting your printer or restoring factory settings can also clear temporary errors and restore printing functionality.
Table of Contents
I.Quick Solutions for Epson Printer Not Printing
II. Why Won‘t My Epson Printer Print?
III. How to Fix Epson Printer Not Printing?
IV. FAQs About Epson Printer Not Printing
V. What If Nothing Works?
II. Why Won‘t My Epson Printer Print?
Here are some common reasons why your Epson printer may not print.
Low or Empty Ink
One of the most common reasons your Epson won’t print is because the ink cartridges are low or out of ink. Low ink levels can affect some colors or even completely disable black and white printing.
Clogged Printhead Nozzles
When your printer is idle for a long time, the ink in the nozzles may dry up and clog the printhead nozzles. This can cause streaks, gaps, or blur in printouts, or even prevent printing entirely.
Paper Issues
Paper-related problems are another common reason your printer won’t print. Issues can include unloaded paper, a paper jam, or using an incompatible paper type.
Incorrectly loaded paper can prevent the printer from detecting the paper. Damaged or warped paper can get stuck in the rollers. Additionally, printing on very thick, coated, or textured paper can trigger sensor errors if the printer is not configured correctly.
Connectivity Issues (Wi-Fi, USB, Network)
If there’s no connection between your printer and your phone/computer, you won’t be able to print. This is especially true with USB connections, which can fail due to a faulty or loose cable. Your computer’s firewall or antivirus software may also be blocking communication with the printer.
Wrong Printer Selected
This is especially common in offices where there are multiple printers or computers connected to several devices. You might not have selected the right printer, causing the document to be sent somewhere else.
Stuck Print Queue
A print queue can become stuck when a document is paused, encounters an error, or exceeds printer memory. While the queue is blocked, new print jobs cannot be processed. This problem often goes unnoticed because the printer may appear to be “Ready” and “Online.”
Outdated or Corrupted Drivers
Outdated or corrupted printer drivers can also cause communication failures between your computer and printer. Over time, updates to the operating system or printer firmware can render older drivers incompatible. This incompatibility can result in errors, incomplete prints, or the printer not responding at all.
III. How to Fix Epson Printer Not Printing?
First, check that your Epson printer is turned on. Plug the printer into an outlet and press the power button. If you simply forgot to press the button, you should be able to print now.
Step 1: Check for Low or Empty Ink
Most Epson printers use ink. They are designed to stop printing when the ink level falls below a certain threshold. Even if the printer appears to have enough ink, it may stop printing to protect the printhead.
If you see these symptoms, the ink cartridge is low or empty, causing the printer to not print.
- Epson printers without a screen: The ink icon on the printer is blinking or solid.
- Epson printers with a screen: The ink icon on the display is blinking; an “Ink low” error message appears.
You need to check your printer’s ink tanks or display to confirm the ink levels. See the blog post “How to Check Ink Levels on Epson Printer” for more information. If any ink cartridge is low or empty, refill or replace it immediately.
In addition, for certain unrecognized third-party or refilled cartridges, Epson may consider the ink depleted and refuse to print, even if the ink remains. Therefore, we recommend using reliable Epson ink, whether genuine or compatible.
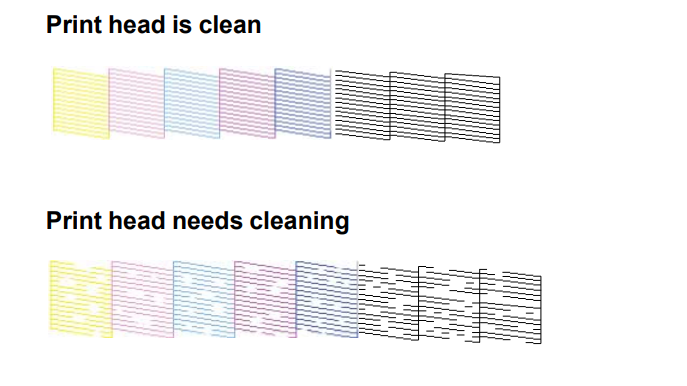
Step 2: Inspect for Clogged Printhead Nozzles
A clogged printhead usually occurs when ink dries due to infrequent use or environmental factors. This prevents ink from flowing properly, causing streaks, gaps, or even complete print failure. If your printer is used only occasionally and suddenly won’t print, this is often the reason.
To check, run a nozzle check on your computer or printer. If you notice gaps in the pattern, perform an automatic printhead cleaning first. If gaps remain, proceed to manual cleaning.
Run Nozzle Check and Automatic Printhead Cleaning
- Windows: Go to “Settings” > “Devices” > “Printers & Scanners” > select your Epson printer > “Manage” > “Printer Preferences” > “Maintenance” > “Nozzle Check.” Print the pattern, inspect it for gaps, and select “Clean” if any lines are missing.
- Mac: Open “System Preferences” > “Printers & Scanners” > select your Epson printer > “Options & Supplies” > “Utilities” > “Open Printer Utility” > “Nozzle Check.” Print the pattern, check for gaps, and choose “Clean” if needed.
If the pattern improves after cleaning, continue printing normally. If gaps still remain, repeat this process up to 3 times.
This method works for most Epson models, including EcoTank ET-2400, ET-2720, ET-2850, ET-4850, Expression ET-2750, Expression Premium XP-540, WorkForce Pro WF-3720/3730/4720/4730, and WF-2950. For instructions on running a nozzle check directly from the printer, refer to your user manual or the guide “How to Run a Nozzle Check on Epson Printer.”
Manual Cleaning
If automatic cleaning doesn’t work, try manual cleaning.
- With the printer turned on, open the cover and move the printhead carriage to the center.
- Place a small piece of absorbent paper or lint-free tissue under the printhead.
- Add a few drops of printer head cleaning solution onto the paper, holding the nozzles firmly against the paper.
- Let it soak for 30 minutes to several hours to dissolve dried ink.
- Remove the tissue and run the built-in printhead cleaning process to remove any residue.
After manual cleaning, run a nozzle check to verify print quality. If gaps remain, you can perform an automatic cleaning and resume normal printing.
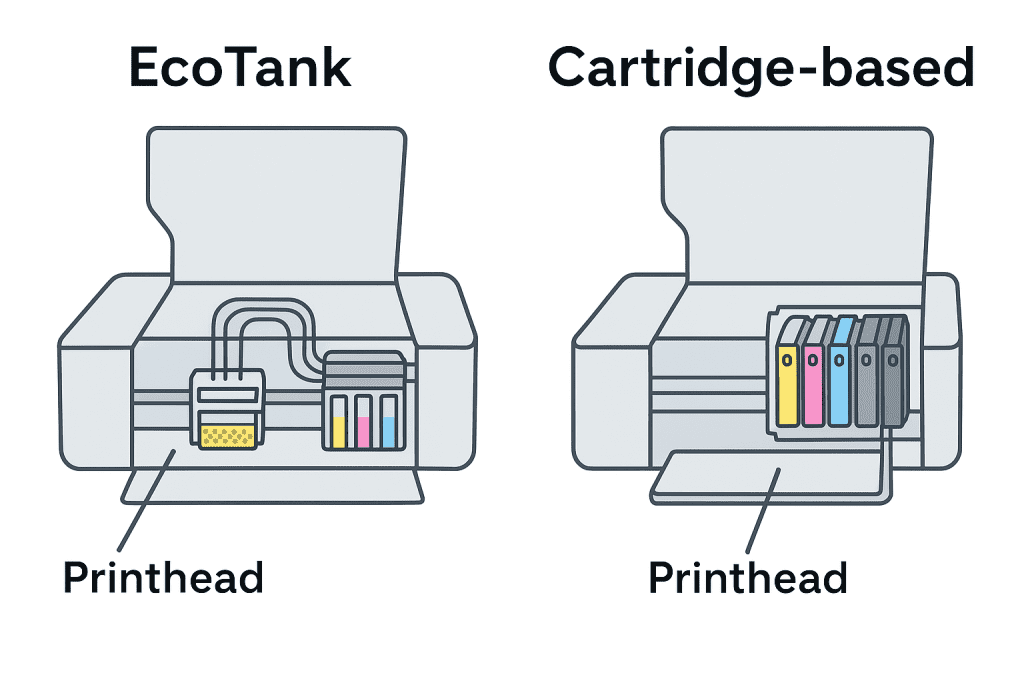
Note: The printhead on Epson EcoTank models receives ink from the ink cartridges through a tube. Examples include the Epson EcoTank ET-2800, ET-3850, ET-4950, ET-5850, and ET-8550.
On Epson cartridge-based models, the printhead is located directly below the ink cartridge slot. For example, the Epson Expression series, Epson WorkForce series and Epson Stylus series are Epson cartridge-based models, such as Epson Expression XP-4100, Expression XP-830; Epson Stylus C120; Epson WorkForce WF-7620, Pro WF-3820 and WF-7310.
We found a video that explains the manual cleaning steps step by step.
Step 3: Look for Paper Issues (No Paper, Jams, or Misfeeds)
The printer may appear ready, but not print due to a problem such as no paper loaded, a paper misfeed, a paper jam, incorrect paper feed, or the paper type.
First, check that the paper is correctly loaded and flat in the paper tray.
Next, check the printer for any paper errors such as a “Paper Jam.” Carefully remove any jammed or misfeeding paper to avoid tearing or debris. The error message typically indicates the location of the jam; if it doesn’t, refer to the blog post “How to Fix a Paper Jam in HP Printer” for instructions on how to remove it.
Also, using thick, textured, coated, or specialty paper without adjusting the printer settings can cause the device to not recognize the media, resulting in error messages or blank output. If your printer displays these errors, confirm that your paper type, thickness, and size are compatible with your Epson printer. When using specialty paper, adjust the printer settings to ensure proper paper feed and print quality.
Step 4: Verify Connectivity (Wi-Fi, USB, or Network)
If everything looks good, check to see if your printer is connected to your device.
Your Epson printer may show it’s connected, but the print job may never reach the printer due to a weak signal, router issues, firewall restrictions, or a temporary network outage.
To check this, please do the following:
First, confirm that your Epson printer is online. For models with a screen, check the status icon on the display or print a network status sheet. For models without a screen, press and hold the Wi-Fi button to print a status page. If the page displays “Connected” and the IP address is valid, the printer is online; otherwise, reconnect.
If your printer is connected via USB, check all physical connections. If it’s connected wirelessly, reconnect to the network. The blog post “How to Connect Epson Printer to WiFi” provides details on connecting via WPS, a simpler wireless connection.
Rarely, your firewall or antivirus software may block printer communication, but if this happens, your computer will typically display a pop-up notification.
Step 5: Make Sure the Correct Printer Is Selected
Sometimes, not printing stems from a simple mistake: selecting the wrong printer. This is especially common in offices or homes with multiple devices, as computers may default to a different printer.
Before sending any documents, make sure the Epson printer is selected as the output printer.
You can also remove unused or offline printers to prevent this error.
It’s also a good idea to set the Epson printer as the default device. This ensures that all future print jobs are sent to the correct device, eliminating the need to manually select it each time.
Step 6: Clear a Stuck Print Queue
If you’re sending multiple print jobs frequently, your printer may not print because the print queue is stuck. In this case, clearing the print queue will remedy the situation. See How Do I Clear Printer Queue for more information.
- Windows: On your computer, open “Settings,” go to “Printers & Scanners,” select the Epson printer, click “Open Queue,” and cancel or delete all pending print jobs. Then, restart the printer and resend the print job.
- Mac: Select “System Settings,” go to “Printers & Scanners,” select your Epson printer, and click “Open Print Queue” to cancel all print jobs.
Step 7: Update or Reinstall Printer Drivers
Drivers act as a bridge between your computer and your Epson printer, converting commands into printable output. When drivers are outdated, incompatible, or corrupted, they can cause print jobs to fail correctly, result in errors, or even render the printer unresponsive.
If the above steps don’t resolve the issue, try reinstalling or updating your printer driver.
Visit the Epson support website (https://www.epson.com/Support) and download the latest driver for your printer model and operating system.
Then, open the file and follow the prompts to install it. Whether you’re using Windows or Mac, the new driver will automatically overwrite the old one; there’s no need to uninstall it first.
Next, verify the update:
- Mac: Go to “System Settings”>”Printers & Scanners” > “Options & Supplies.”
- Windows: Open “Control Panel” > “Devices and Printers” > “Printer Properties.”
You can then print a test page to see if it prints.
Step 8: Reset Your Epson Printer
Resetting an Epson printer often resolves errors that persist after standard troubleshooting. This clears any temporary software or hardware configuration issues, allowing the printer to restart.
Turn off your printer and unplug it for 1-2 minutes. Plug it back in, turn it on, and print a test page to see if printing resumes.
If this doesn’t work, you may need to factory reset your Epson printer. See the blog How to Reset Epson Printer for detailed instructions.
After resetting, reconnect your printer to the network and run a test print.
IV. FAQs About Epson Printer Not Printing
Q1: Why won’t my Epson printer connect to Wi-Fi?
This could be caused by a weak signal, an incorrect password, or a network change.
First, make sure your printer is within range of your Wi-Fi router and connected to the correct network.
Then, restart the router and printer and see if you can connect to the WiFi.
You can also try resetting the network settings on the printer display to reconnect.
Q2: Why is my Epson printer connected but not printing?
If the printer shows “Connected,” it’s working properly, but there may be an operation error.
Make sure your Epson printer is selected as the print device, the print queue is normal, there is enough ink, and the paper is loaded correctly.
Q3: Why is my Epson printer not printing black?
If the black ink cartridge is low on ink, empty, or clogged, black might not print.
Check the ink level on your Epson black ink cartridge and replace it if it’s low or empty. Also, run a nozzle check to see if there’s any ink clog.
Q4: Why is my printer printing blank pages when it has ink?
Blank pages are often caused by improperly installed ink cartridges, clogged nozzles, or misidentification errors.
First, open the printer cover and check that the ink cartridges are in the correct color slots. Second, confirm that your ink cartridges are compatible with your Epson printer. Finally, run a nozzle check to see if any ink is clogging the printheads.
Q5: Why is my Epson printer not printing when the ink is full?
Possible causes include: misaligned print heads, clogged nozzles, or the printer not recognizing the ink cartridges.
If you recently replaced the ink cartridges: Reinstall the ink cartridges and align the printheads. On your computer, open the printer settings, go to the “Maintenance” tab, and then select “Printhead Alignment.” Also, make sure the ink cartridges are compatible with your printer model.
If the printer has not been used for a while: Run a nozzle check and clean the printheads. This usually restores normal printing.
Q6: Why is my printer working but not printing anything?
This could be due to a connection issue, incorrect printer selection, or a paper problem.
Confirm that your printer and device are connected, that the Epson printer is selected when printing, and that paper is loaded and not jammed.
V. What If Nothing Works?
- Try printing from another device to rule out computer-related issues.
- Contact Epson customer support for professional assistance.
- If the hardware problem persists, consider seeking professional repair.
- Evaluate whether replacing the printer is more cost-effective than repairing it.
VI. The Final Word
If your Epson printer isn’t printing, it doesn’t necessarily mean there’s a serious problem. This blog provides detailed, step-by-step troubleshooting guides to help you effectively identify and resolve most issues. Not only can you quickly resolve emergency situations, but you’ll also find detailed steps to ensure normal printing.
Explore More: Blogs You’ll Want to Read Next