How to Fix Epson Printer Head Alignment Not Working
A bad printhead alignment can ruin your printing experience. If you notice that your prints are blurry, colors are misaligned, or streaky, your Epson printer may have a problem with its printhead alignment. This common problem affects print quality but can usually be fixed with troubleshooting. This blog will tell you the cause and step-by-step guide to fix Epson printer head alignment not working.
Why Epson Printer Head Alignment Fails?
The following are the most common reasons why the printhead alignment fails on Epson printers:
- Clogged or Dirty Print Heads: Over time, ink residue can build up and clog the tiny nozzles. This prevents ink from flowing properly and disrupts the calibration pattern.
- Low or Expired Ink Cartridges: When ink levels are critically low or cartridges are expired, the printer may have difficulty maintaining a consistent flow of ink during the calibration process.
- Incorrect Paper or Media Settings: Using the wrong paper type setting (such as selecting “plain paper” when printing on photo paper) can cause calibration problems because different papers absorb ink differently.
- Outdated Printer Drivers: The printer driver acts as a translator between the computer and the printer. If the driver is outdated, calibration commands may not be communicated correctly.
- Mechanical Issues: In rare cases, physical problems with the printhead mechanism or carriage movement can also affect calibration.
How to Fix Epson Printer Head Alignment Not Working?
By determining what factors may be affecting your printer, you can apply the most appropriate solution from our troubleshooting guide.
1. Basic Troubleshooting
We can initially repair your Epson printer by performing the following basic checks.
Restart the Printer & Computer:
This simple step can clear temporary glitches in both devices. First, turn your printer completely off by unplugging it, wait 30 seconds, then plug it back in and turn it back on. Also, restart your computer. Now check to see if the problem has been fixed.
Check Ink Levels:
Check your Epson printer’s ink levels on your printer screen or on your computer. Once you find that the ink level is low or empty, replace it with a new one. Now, start the printhead alignment to see if the results improve. Refer to the blog How to Check Ink Levels on HP Printer for more information. Usually you can find the ink levels in a similar way.
Verify Paper Settings:
Find your printer settings on the printer’s display or in the Print dialog box on your computer and confirm that the selected paper type matches the paper type you loaded. Always use plain white paper when aligning.
Inspect Paper Path:
There is also the possibility that the Epson printhead alignment is not working due to a paper jam. Refer to the blog How to Fix a Paper Jam in a Canon Printer to clear any paper jams or obstructions that may be causing paper feed problems.
These basic steps can quickly resolve many alignment issues. If the problem persists, try the further solutions below.
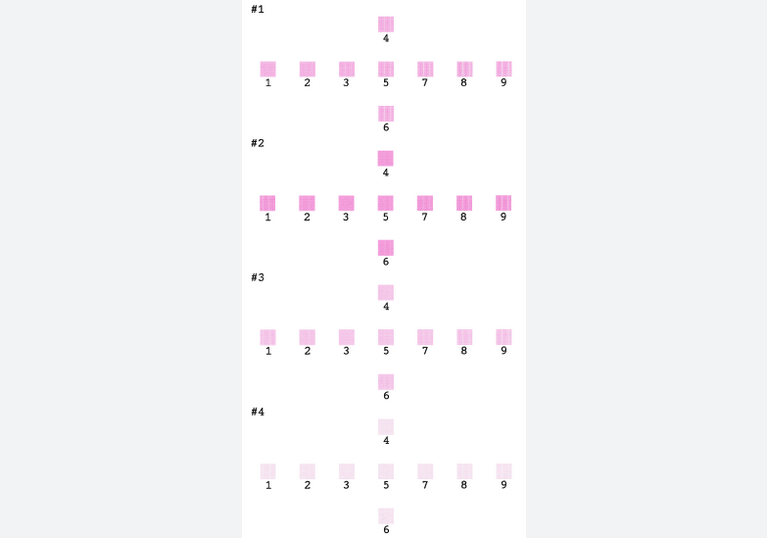
2. Run the Built-in Head Alignment Tool
Epson printers have a built-in alignment utility that can automatically correct misalignment.
Prepare Your Printer: Load 5-10 sheets of A4 or Letter-sized plain white paper into the main paper tray. Make sure the paper is flat and not curled or wrinkled.
Access Alignment Utility: Next, you can open the Epson Printer Utility on your computer. It’s in “Applications” or “Control Panel.” Alternatively, you can find it by navigating the “Settings” or “Maintenance” menu on your printer.
Start Alignment Process: Select “Head Alignment” or “Print Head Alignment,” and follow the on-screen instructions.
Complete the Alignment: Finally, the printer will print a test pattern. You may need to scan this page or manually enter the values in the pattern. Some models will automatically adjust based on the printed pattern. If manual input is required, calibrate in a well-lit area to ensure accurate pattern recognition. Check that the printhead is correctly calibrated.
3. Clean the Print Heads
Clogged nozzles are one of the most common causes of calibration failures. We can address this with both automatic and manual cleaning options. Refer to the blog How to Clean Brother Printer Heads for more details.
3.1 Automatic Cleaning (Via Printer Utility)
Automatic cleaning cycles are your first line of defense against printhead clogging:
Initiate Nozzle Check:
Access your printer’s “Maintenance” menu and select “Nozzle Check” to print a test pattern. Check the pattern for missing lines or gaps.
Perform Head Cleaning:
If the test reveals missing nozzles, select “Head Cleaning.” The printer will cycle ink through the nozzles to clear blockages. Then, wait 2-3 minutes between cleanings to prevent overheating.
Verify Results:
After each cleaning, check the nozzles again. Most clogs resolve after 1-3 cleaning attempts.
Note that excessive cleaning (more than 3 times in a row) wastes ink. If the clog persists after multiple cleanings, perform manual cleaning.
3.2 Manual Cleaning (For Stubborn Clogs)
When automatic cleaning fails, a gentle manual approach may be necessary.
Prepare Your Workspace
First, turn off the printer and unplug it. Then, prepare distilled water, lint-free cloths, and cotton swabs.
Access the Print Head
Open the printer according to your printer model manual, you can usually open its top cover or front door. Then, find the print head carriage, which usually moves to the center position when the printer is turned on. Do not touch the electrical contacts or use alcohol-based cleaners as these may damage the print head assembly.
Clean Gently
Remove the ink cartridge (if applicable). The nozzle on the carriage is where the ink comes out, the printhead. Then, dampen a piece of cloth with distilled water (never tap water). Apply gentle pressure and wipe the surface of the printhead. For stubborn stains, use a damp cotton swab.
Dry Thoroughly
After wiping, let all components air dry completely, then reassemble and start the printer, and start aligning the print head again.
4. Update or Reinstall Printer Drivers
Outdated or corrupted drivers often cause communication errors between your computer and printer. Follow these steps to make sure your drivers are up to date:
For Windows Users:
Press “Win+X” and select “Device Manager,” then find the “Print queues” and locate your Epson printer. Right-click the printer and select “Update driver.” Choose “Search automatically for updated driver software.”
For Mac Users:
Go to “System Settings,” find the “Printers & Scanners.” Select your Epson printer and click the minus (-) button. Then, visit Epson’s support site for your printer model. Download and install the latest macOS-compatible driver. Then , add printer again. Click the plus (+) button in “Printers & Scanners,” follow prompts to re-add your printer
5. Reset the Printer
If that doesn’t work, consider resetting the printer, which clears all custom settings. Our blog How to Reset Epson Printer provides more details.
Soft Reset:
Turn off the printer, unplug the power cord from the printer and the wall outlet, and wait at least 2 minutes. This will discharge all capacitors. Then, reconnect the power and turn the printer on.
Factory Reset:
If your printer has a screen, access the printer’s “Service” menu, navigate to the “Reset” or “Restore Defaults” option, and confirm the reset when prompted. If your printer doesn’t have a screen, find the relevant settings in your printer software on your phone.
6. Contact Epson Support
If all other methods fail, you may need professional assistance. You can get further help through online consultation on the Epson support website, telephone support, or an authorized service center.
Conclusion
Dealing with an Epson printer that has its printhead alignment feature not working properly can be frustrating, but systematic troubleshooting can usually resolve the issue. By following this comprehensive guide you’ll maintain optimal print quality and extend the life of your printer.