
How to Add a Printer by IP Address – Windows 10/ Windows 11 / Mac
In today’s world of interconnected devices, adding printers to the network using IP addresses has become a common task in home and office environments. Whether you are setting up a reliable printer for the workplace or configuring a device at home, adding a printer using an IP address ensures stability and accuracy and often eliminates connectivity issues that can arise from auto-detection.
This guide will walk you through the process for Windows, macOS and Linux, while providing troubleshooting tips to make the process seamless.
Index:
How to Add a Printer Using IP Address
Troubleshooting Common Issues
More FAQs
Conclusion
How to Add a Printer Using IP Address
For Windows Users
On Windows 10
1. Open the Start menu, enter “printers” in the search box, and then select Printers & scanners.
2. Click on Add a printer or scanner. Wait for The printer that I want isn’t listed to pop up and click it.
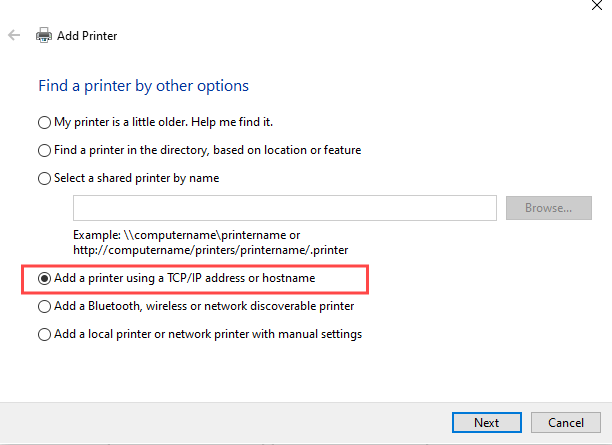
3. In the next window, select the option Add a printer by TCP/IP address or hostname, then click Next.
4. Set the Device type to TCP/IP Device.
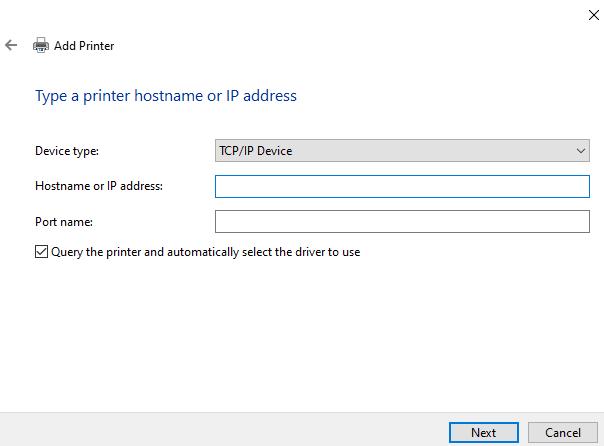
5. In the field labeled “Hostname or IP Address,” enter the printer’s IP address. At the same time, the port name is automatically populated.
6. Keep the Query the printer and automatically select the driver to use checked. Then, click Next.
7. Download the printer driver according to the prompts.
8. According to your needs, set whether the printer is shared and whether it is the default printer. Then, you have finished all the processes of connecting the printer with an IP address.
On Windows 11
1. Type “printers” in the search bar on the Start menu and search for Printers & scanners.
2. Click Add a printer or scanner > Add Device.

3. Click Add Manually next to The printer that I want isn’t listed.

The rest of the steps are the same as adding a computer via an IP address on Windows 10 (Steps 4-8).
For macOS Users
1. Go to the Apple menu > System Preferences > Printers & Scanners.
2. Find and click the + button at the bottom of the list of printers.
3. Switch to the IP tab in the “Add Printer” dialog.
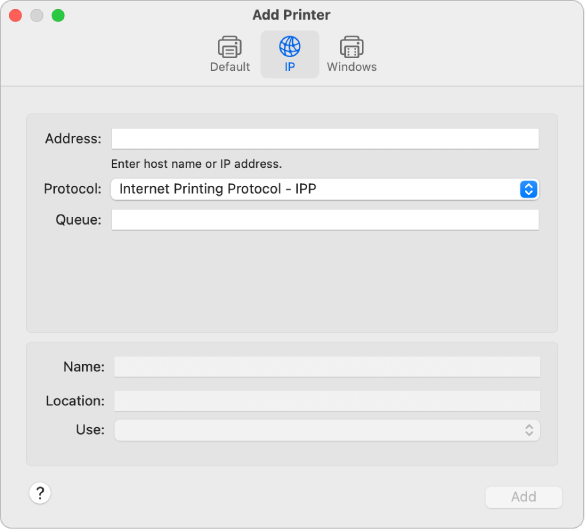
4. Input the printer’s IP address in the Address field.
5. The Queue can be left blank, and the Name and Location are optional to help identify the printer.
6. MacOS may automatically detect the driver, but if it doesn’t, you’ll need to download and install it from the printer manufacturer’s website.
7. Click Add, and the printer will be added to your list. You can print a test page to verify the connection.
For Linux Users
1. Navigate to your system settings and open Printers.
2. Click Add or the + button.
3. Choose Network Printer or manually input the printer’s IP address and protocol (such as IPP or LPD).
4. Input the printer’s details, like its IP address and port (commonly 9100 for HP JetDirect).
5. Select or install the correct driver for the printer.
6. Save your settings and print a test page to confirm the setup.
Troubleshooting Common Issues
Even when these simple steps are taken, problems can occur. The following are ways to deal with common problems:
- Printer Not Detected
- Verify the IP address of the printer:
- Many printers have a Network Configuration Page option that you can print to verify the IP.
- Many printers have a Network Configuration Page option that you can print to verify the IP.
- Make sure your printer and computer are on the same network.
- Use the command prompt (ping [IP address]) to ping the printer’s IP address to confirm the connection.
- Verify the IP address of the printer:
- Incorrect Printer Driver
- Visit the manufacturer’s website to download the latest driver.
- For universal solutions, some manufacturers (such as HP or Epson) offer universal drivers for multiple models.
- Visit the manufacturer’s website to download the latest driver.
- IP Address Change
- Assign the printer a static IP address through your router settings to prevent its IP address from changing in the future.
- Firewall or Network Restrictions
- Ensure that your firewall or network security software is not blocking the printer’s IP address.
- In an office environment, consult your network administrator.
- Ensure that your firewall or network security software is not blocking the printer’s IP address.
More FAQs on How to Add a Printer Through IP Address
How to find a printer’s IP address?
You can typically find your printer’s IP address by:
- Printing a Network Configuration Page (available in most printer menus).
- Checking the printer’s display panel under network settings.
- Logging into your router’s admin panel to see connected devices.
What is the best protocol to use for IP-based printing?
The most commonly used protocols are:
- HP JetDirect (9100): Best for HP and some other network printers.
- IPP (Internet Printing Protocol): A modern, flexible option for most printers.
- LPD (Line Printer Daemon): Older but still widely supported.
Choose the protocol based on your printer’s compatibility.
Can I assign a static IP address to my printer?
Yes, assigning a static IP ensures the printer’s address doesn’t change over time. This can be done:
- Via your printer’s network settings menu.
- Through your router’s DHCP reservation settings.
What should I do if I can’t find my printer’s driver?
- Visit the manufacturer’s website to download the latest drivers.
- Some printers support universal drivers offered by manufacturers like HP or Epson.
- Make sure that the driver matches the version of your operating system.
Can I connect multiple computers to the same printer via IP address?
Yes, multiple computers can connect to the same printer using its IP address, as long as they are on the same network.
What happens if my printer’s IP address changes?
If the printer’s IP changes due to DHCP settings, it may stop working. To avoid this, assign a static IP or configure a DHCP reservation for the printer in your router.
Is adding a printer through IP address secure?
Adding a printer through IP address is secure as long as your network is protected with a strong password and proper firewall settings. Avoid using open or public networks for sensitive printing tasks.
Do I need admin rights to add a printer by IP address?
On most systems, adding a printer by IP address requires administrative privileges. Ensure you have the necessary permissions on the computer you’re using.
What if my printer doesn’t support IP-based printing?
If your printer lacks network capabilities, you may need to connect it via USB or set it up as a shared printer on a computer connected to the network.
Conclusion
Adding printers by IP address is an efficient and reliable method that works across multiple operating systems. By following the steps outlined above, you can avoid common pitfalls in printer setup and keep your devices running smoothly. Whether you are in an office environment or at home, taking the time to properly configure your printers can save time and stress.
More blogs you may be interested in:

The ideal answer
In it something is. Now all turns out, many thanks for the help in this question.