How to Reset Epson Printer?
Epson printers are reliable and widely used, but if they malfunction, they may need to reset. When you are experiencing connection issues or persistent error messages, resetting your Epson printer can often resolve the issue. In this blog, we will walk you through the step-by-step steps to reset your Epson printer, including both a soft reset and a factory reset.
I. Types of Epson Printer Reset
Depending on the problem you’re experiencing, you may need to perform a soft reset or a hard reset.
1. Soft Reset (Restarting the Printer)
A soft reset is the easiest and quickest way to fix minor printer problems. This reset helps clear temporary errors without changing any settings. It does not delete any stored preferences, so it is often the first step in fixing common printer problems.
Good for: The printer is slow or unresponsive; The printer is experiencing a temporary error; The print job is stuck in the queue; There are minor network or connection issues.
2. Factory Reset (Restoring to Default Settings)
A factory reset is also called a hard reset. It is more advanced than a soft reset and is used when there are persistent problems, such as a failed WiFi network connection. This reset will return the printer’s settings to the default configuration while keeping the installed firmware intact. When a soft reset doesn’t solve the problem, you can use this method to fix it. However, after a factory reset, you will need to reconnect to the network and set up print settings, so it is best to back up important configurations in advance.
Suitable for: The printer keeps giving error warnings; The network connection fails repeatedly; You want to resell the printer or give it to a new user.
NOTE: Factory reset does not work for the firmware downgrade. It only helps you reset the printer settings.
II. How to Reset My Epson Printer?
Below, we’ll walk you through a detailed step-by-step guide to help you reset your printer effectively.
1. Determine the Type of Reset You Need
Before you begin, choose the reset method that best suits your printer’s situation. If your printer is running slow, unresponsive, or experiencing minor issues, soft reset your Epson printer. If your Epson printer continues to have connection issues, doesn’t print correctly, or you want to return the printer to its default state, factory reset it.
2. Perform the Reset
Option 1: Soft Reset
First, turn off your Epson printer and unplug the power cord from the printer and the wall outlet. Then, wait for 5-10 minutes and turn the printer back on to check if the problem is resolved.
Option 2: Hard Reset
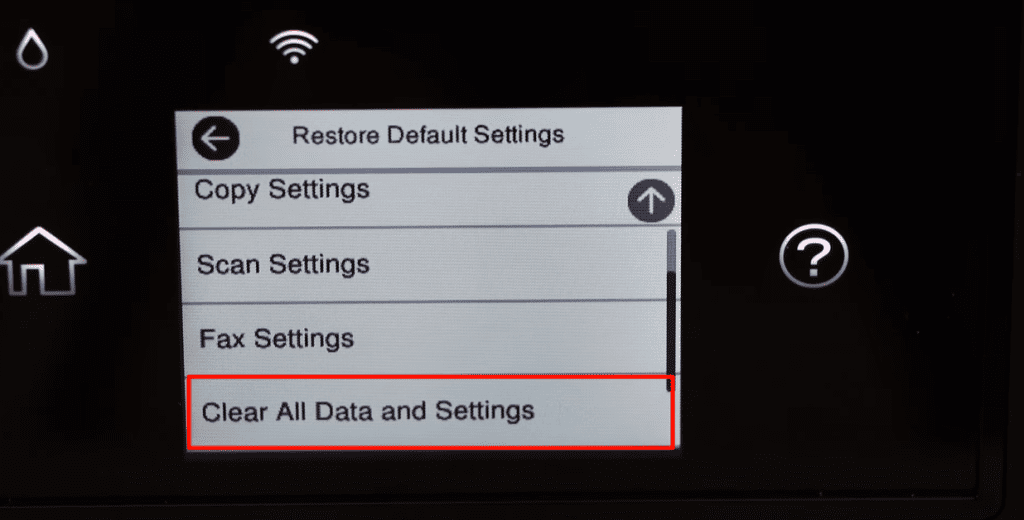
When the soft reset fails or the printer keeps reporting errors, it is time to restore the factory settings. You can usually reset the printer by going into “Settings” and selecting “Restore Defaults Settings.” The reset method varies for different Epson printers. Search for words like “default,” “reset,” or “factory” in your printer’s manual to find out how.
①”Settings” > “Restore Default Settings” > “All Settings” > “OK”/”Yes”
E.g., Epson EcoTank ET-2760; Epson Expression ET-2750; Epson Expression Home XP-4100; Epson Expression Home XP-4105; Epson Expression Home XP-4200; Epson Expression Home XP-4205; Epson EcoTank Photo ET-8500; Epson EcoTank Photo ET-8550.
②”Settings” > “Restore Default Settings” > “Clear All Data and Settings” > “OK”/”Yes”
E.g., Epson EcoTank ET-2720; Epson EcoTank ET-2800; Epson EcoTank ET-2803; Epson EcoTank ET-2850; Epson EcoTank ET-15000; Epson WorkForce Pro WF-3820; Epson Workforce Pro WF-3823; Epson WorkForce Pro WF-3825; Epson WorkForce WF-2930; Epson WorkForce WF-2950.
③”Settings” > “General Settings” >”System Administration” >”Restore Default Settings” > “Clear All Data and Settings” > “Yes”
E.g., Epson EcoTank Pro ET-5800; Epson EcoTank Pro ET-5850; Epson EcoTank Pro ET-5880; Epson WorkForce Pro WF-4820; Epson WorkForce Pro WF-4830; Epson Workforce Pro WF-4833; Epson WorkForce Pro WF-4834; Epson Workforce Pro WF-7820; Epson Workforce Pro WF-7840.
④”Settings” > “General Settings” >”System Administration” >”Restore Default Settings” > “All Settings” > “Yes”
E.g., Epson Workforce Pro WF-7310
Additionally, some Epson EcoTank printers cannot be reset to default settings through the printer control panel, such as the Epson EcoTank L3150, EcoTank L3250, and EcoTank L3251. They may require software called EPSON Adjustment Program to perform a hard reset.

III. After the Epson Printer Reset
1. Reconnect the Printer to Your Network (If Needed)
When you perform a factory reset, your printer will lose its Wi-Fi settings and you will need to reconnect it. Generally speaking, following the steps below will connect your Epson printer again. Check out our blog, How to Connect Epson Printer to WiFi, for more details.
- Go to “Setup,” select “Wi-Fi Settings,” and then select “Wi-Fi Setup Wizard.”
- Next, select your Wi-Fi network from the available list, enter your Wi-Fi password and confirm it.
- Finally, print a “Network Status Report” to verify a successful connection.
2. Reinstall Printer Drivers (If Needed)
In addition to reconnecting the printer network, your computer may not recognize some printers. If your computer does not detect your Epson printer, reinstall the printer driver.
Visit the Epson Support website and enter your printer model to download and install the latest driver. Finally, restart your computer and printer and do a test print.
IV. Frequently Asked Questions About Resetting Epson Printers
1. What to Do If My Epson Printer Still Doesn’t Work After Resetting?
If your Epson printer is still having issues after performing a hard reset, try the following to see if it works.
- Reinstall the Printer Driver: A corrupted driver can cause connection issues. Uninstall and reinstall the printer driver.
- Check for Paper Jams: Minor paper jams can cause your printer not to work. Open the Epson printer cover to check for paper jams.
- Make Sure the Ink Cartridges Are OK: Check if your Epson ink cartridges are properly installed and recognized by the printer.
- Try a Different Connection Method: If you are currently using a Wi-Fi connection, switch to USB or Ethernet to see if your Epson printer works.
If none of these steps work, contact Epson customer service for further assistance.
2. Does an Epson Printer Have a Reset Button?
Yes, some older Epson printers come with a physical reset button, usually located on the back of the printer near the power port or network connection. This button allowed users to reset the printer settings quickly. However, Epson has removed it in newer models. As mentioned earlier, you need to reset the printer settings through the options on the printer panel.
3. How to Reset a Printer Cartridge?
When your Epson printer fails to recognize the ink cartridge or displays an “Ink Cartridge Not Detected” error, try the following steps to reset the ink cartridge.
- Turn off your Epson printer and remove the ink cartridge.
- Find the chip on the ink cartridge (the small gold or silver square)
- Then, use an ink cartridge resetter (a small device designed for Epson ink cartridges).
- Align the ink cartridge’s chip with the resetter’s contacts and hold for 5-10 seconds.
- Wait for the resetter’s light to flash, indicating that the reset is complete.
- Reinsert the ink cartridge into the printer and turn the printer back on.
- Finally, print a test page to confirm that the ink cartridge has been recognized.
If your printer still cannot recognize the ink cartridge, try cleaning the chip with a dry cotton swab and reinserting it. Alternatively, replace it with a new compatible Epson ink cartridge or a genuine product to help you continue printing.
4. How to Reset an Epson Ink Cartridge Chip Without a Resetter?
If you do not have a cartridge resetter, try the following method.
- Override the Ink Warning Message: When you see the “Ink Cartridge Empty” message, press and hold the “Stop” or “Resume” button on the printer for 5-10 seconds. This forces your Epson printer to ignore the warning and continue printing. If successful, your printer will print normally, but the print quality may be reduced due to the low ink.
- Remove and Reinsert Your Ink Cartridge: Open the printer cover and remove the Epson ink cartridge. Then, turn off the printer and wait for 5 minutes. Finally, reinstall the ink cartridge and turn on your printer to see if the problem has been solved.
- Clean the Cartridge Chip: If there is dirt or dust on the Epson cartridge chip, it will prevent your cartridge from being recognized. You can use a dry, lint-free cloth or cotton swab to gently wipe the chip on the cartridge. Then, reinsert the cartridge and see if it is recognized.
5. How Do I Reset My Epson Ink Pad Warning?
Epson printers have an internal waste ink pad that collects excess ink during printing and maintenance tasks. When the waste ink pad reaches its limit, the printer may stop working and display messages such as “Ink Pad is at the End of Its Service Life” and “Printer Requires Maintenance.”
To reset the ink pad counter, you need to use the Epson Adjustment Program (WIC Reset Utility):
- First, download the WIC Reset Utility from a trusted source, open it and select your Epson printer model.
- Click “Read Waste Counters” to check the ink pad usage. If the counter is above 100%, click “Reset Waste Counters.”
- The program will prompt you to enter a reset key, which may require purchasing a key from an authorized vendor.
- After entering the reset key, click “OK” to complete the reset process.
- Finally, turn off your Epson printer, wait a few seconds, and then turn it back on. The error should have disappeared.
Resetting the ink pad counter is a temporary solution. If your printer frequently displays this warning, consider replacing the waste ink pad or contact the Epson support team for help.
V. Final Thoughts
Resetting your Epson printer can resolve a variety of issues. Depending on the situation, you can choose a soft reset or a factory reset. If you continue to experience problems with your Epson printer after resetting it, consider contacting Epson Customer Support.
More Epson Printer–Related Blogs: