
Long Edge vs Short Edge Printing: What’s the Difference?
If you’ve ever printed a double-sided document only to find the pages upside down or in the wrong order, then you need to consider the printing orientation: whether to print along the long edge or the short edge. In this blog post, we’ll clearly explain the difference between long edge vs short edge printing and show you how to choose the correct setting for your project. Choosing the right option will not only save paper but also ensure that your reports, brochures, presentations, and other documents look neat, professional, and easy to read.
Flip on Long Edge vs Flip on Short Edge: What Does This Mean?
Let’s start with a basic question: What is a long edge in a printer? Every standard sheet of paper, such as A4 or Letter size, is rectangular. It has two longer sides (long edges) and two shorter sides (short edges).
In printing, long-edge printing and short-edge printing refer to the direction in which the printed document is flipped or bound.
“Flip on long edge” means the pages are turned or bound along the longer edge of the paper. You turn the pages from right to left; this is the way books and most magazines are usually bound.
“Flip on short edge” means the pages are turned or bound along the shorter edge of the paper. This is usually done by turning the pages from bottom to top, such as with wall calendars and top-bound notebooks.
Flip on Long Edge vs Short Edge: What’s the Difference?
By selecting “Flip on Long Edge” or “Flip on Short Edge,” you will obtain different double-sided printing effects. The following are the main differences between these two printing settings (including portrait and landscape printing settings; see the video for more details).
| Feature | Flip on Long Edge | Flip on Short Edge |
| Common Reference | “Like a Book” | “Like a Notepad” or “Like a Calendar” |
| Rotation Axis | Pages rotate around the long edge of the paper. | Pages rotate around the short edge (top) of the paper. |
| Best For | Portrait-oriented documents (letters, reports, manuscripts). | Landscape-oriented documents (presentations, spreadsheets) or portrait documents intended for top binding. |
| Reading/Flip Direction | Pages are turned side-to-side (left to right). | Pages are turned top-to-bottom (like flipping a pad). |
| Default Binding Edge | Left side (when paper is portrait). | Top edge (when paper is portrait). |
| Visual Result | Both sides of the paper appear upright when the long edge is bound. | The back side appears upside-down relative to the front if bound on the short edge, ensuring correct orientation when flipped top-to-bottom. |
1. Rotation Axis & Page Mechanics
The fundamental difference lies in which axis the page content rotates around during double-sided printing.
“Flip on long edge” rotates content around the vertical axis (the long side of the paper), producing a familiar left-to-right page-turning motion, just like reading a book.
In contrast, “Flip on short edge” rotates content around the horizontal axis (the short side), resulting in a top-to-bottom flipping motion, similar to turning the page of a wall calendar or a top-bound notepad.
2. Where They Are Used
The two settings are designed for distinct document formats and finishing methods.
“Flip on long edge” is suitable for standard portrait-oriented documents, such as reports, letters, or manuscripts. Its function is to facilitate binding along the left edge (the long edge), achieving the horizontal page-turning effect common in books.
“Flip on short edge” serves a different purpose. It is the required setting for landscape-oriented materials like presentations or spreadsheets. It is also used for portrait documents intended for binding at the top edge (the short edge), such as legal pads or top-bound manuals, creating a vertical, top-to-bottom flipping motion.
3. Visual Effects and Results
The visual and practical effects of the two settings are distinctly different.
When using “Flip on long edge,” the content on the front and back of the paper is oriented in the same direction. When you hold the printed stack of paper on the left side, each page (recto and verso) appears upright, resulting in a coherent and professional-looking bound document.
When using “Flip on short edge,” the logic is reversed, but it also ensures readability. Here, the content on the back of a sheet is rotated 180 degrees relative to the front. While this makes a single, loose sheet appear to have an upside-down back, it guarantees that once the stack is bound at the top, flipping pages upward reveals every page in the correct, right-side-up orientation.
How Does It Affect Your Document?
You might be wondering: does short/long edge affect quality? The answer is no. This setting only determines the binding direction for doublesided printing—it rotates the page content so that it displays correctly on both sides of the paper. It does not change the actual print quality, such as resolution, color accuracy, or ink density.
When the long edge or short edge setting is incorrect, it can cause the pages to be flipped the wrong way, making the document difficult to read and appear unprofessional. In short, it affects usability, not image quality.
For many people, the difficulty lies not in understanding the concept, but in remembering it when printing. So, what’s the easiest way to remember the difference between long-edge and short-edge binding? Here are two simple and easy-to-remember tips:
The first method is to look at whether the binding is along the long edge or the short edge. If you are binding along the long edge, it’s long-edge printing; conversely, it’s short-edge printing.
The second method is the “hands-on” method. Take a blank piece of paper and hold it vertically (portrait orientation). Flip the paper from side to side, like turning the pages of a book. This is long-edge binding. Now, flip the same piece of paper up and down (like turning to the next page of a notepad). This is short-edge binding.
What’s the Easiest Way to Remember Long Edge vs Short Edge?
The challenge for most people isn’t understanding the concept, but remembering which option to choose when faced with the print dialog box. Here are two simple and easy methods.
Method 1: The Binding Edge Check
First, you need to determine which edge of your document needs binding. If you are binding along the long edge, such as a book spine or a report bound on the left side, you need to select “Flip on long edge.” If you are binding along the short edge, such as the top of a notebook or calendar, you need to select “Flip on short edge.”
Method 2: The Hand Motion Test
First, take two sheets of A4 paper and place them in front of you as you normally would (portrait orientation). If you need to flip the pages horizontally from left to right, like turning the pages of a book, then select long edge printing. If you need to flip the pages vertically from top to bottom, like turning the pages of a calendar or notebook, then select short edge printing.
In short, Long Edge flips like a book; Short Edge flips like a notepad. These simple methods will save you from multiple print tests and printing errors.
Should I Print on the Long Edge or Short Edge?
This isn’t about print quality, but rather about how the document is bound. Follow these three steps to make the correct choices for double-sided printing.
Step 1: Decide Which Edge to Bind.
Consider the binding method of the final document: will it be bound along the long edge or the short edge? Focus on the edge’s length, not whether it’s on the left or top.
To bind along the long edge, select “Flip on long edge.” To bind along the short edge, select “Flip on short edge.”
Step 2: Match the Orientation to Your Document’s Layout.
After you’ve selected whether to flip along the long or short edge, you also need to set the “Orientation” to match the document layout. The “Orientation” option usually provides three choices: Auto, Portrait, and Landscape. See more in the blog Portrait vs Landscape Printing: Key Differences and When to Use Each.
Combining these two options typically results in four printing effects; choose the one that best suits your needs: ① Flip on long edge, Portrait; ② Flip on long edge, Landscape; ③ Flip on short edge, Portrait; ④ Flip on short edge, Landscape.
For example, for tall, narrow pages, choose “Portrait” (e.g., letters or reports). For wide, short pages, choose “Landscape” (e.g., spreadsheets or slides). For simple documents, using “Auto” is convenient, but for more precise results, it’s best to manually select “Portrait” or “Landscape.”
Step 3: Always Check the Print Preview.
Scroll through the print preview pages in the print window: Are all pages, especially pages two and three, oriented correctly?
If the back of a page appears upside down, go back and change the “Flip” setting (change “Flip on long edge” to “Flip on short edge,” or vice versa). The preview window will update immediately to show the correct page layout.
By following these three steps, you will obtain a printed document with the ideal page orientation.
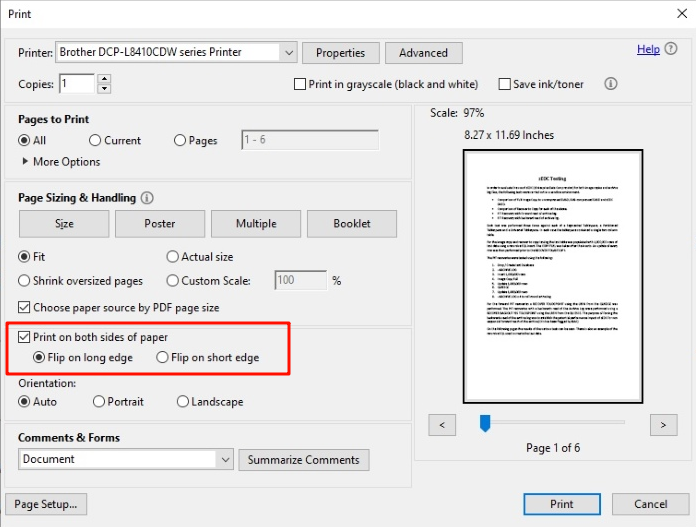
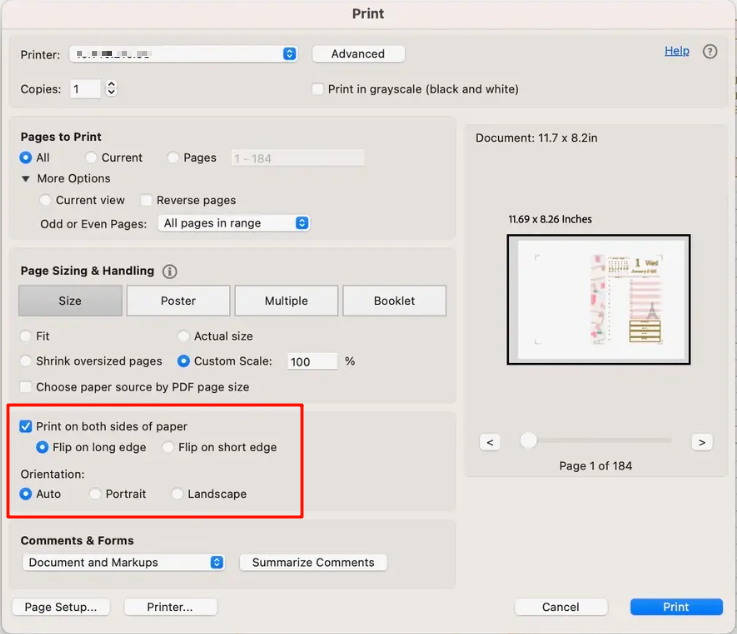
How to Perform Long Edge or Short Edge Printing?
- Go to “File” and click “Print”; or use the keyboard shortcut Ctrl+P or Command+P to open the print window.
- Select your printer and basic options, such as “Copies” and “Pages to Print.”
- Then find and enable the “Print on Both Sides” option, and select “Flip on long edge” or “Flip on short edge”.
- Next, set the orientation to “Auto,” “Portrait,” or “Landscape”.
- Finally, click “Print” to print the document.
The video below demonstrates four different printouts with varying flip directions and page layouts.
Wrap It Up
Choosing to flip on the short edge versus the long edge is a functional choice that guides the printer’s mechanical operation to match the document’s design. By following the guide above, you can ensure that every double-sided printout is perfect.
Explore More: Blogs You’ll Want to Read Next
Never knew what short edge and long edge with portrait or landscape settings combined meant or what would result. This video truly explains in excellent simple understanding how it works. Beautiful explanation and well done. Thank You.