What Is a Printer Printhead?
Inkjet printers have become an indispensable tool in homes and businesses for printing documents and photos. Every time you print, there is a small and often overlooked component that plays an important role – the printhead. So, what is a printer printhead? In this blog, we will dive into the world of print heads and introduce you to their definitions, types, cleaning methods, etc.
Table of Contents
I. What Is a Printer Printhead?
What is a printhead on a printer? The printhead is the component of a printer that is responsible for transferring ink to the printing surface.
Generally speaking, we are talking about the print head on an inkjet printer. It uses heat or electrical charge to push droplets of ink through tiny nozzles and spray them onto paper to form the desired text or image.
In addition to inkjet printers, some printers, such as thermal printers, use a different type of printhead. They use a thermal printhead that uses heat to melt ink from a ribbon onto the paper to create text or images.
II. Types of Printheads
Print heads can be divided into different types depending on the technology they use or their location in the printer.
1. According to the Printhead Technology:
Thermal Printhead
Thermal printheads are commonly used in inkjet printers from brands such as HP and Canon. When a print command is received, the printhead quickly heats the ink in the ink chamber, creating bubbles and ejecting tiny droplets from the nozzle. This process enables inkjet printers to print at high speeds and precision.
In addition, there are thermal print heads that apply heat to paper or use heat to melt ink from an ink ribbon onto paper. They are commonly found in direct thermal printers and thermal transfer printers to print labels and receipts. See the blog Do Thermal Printers Print in Color.
Piezoelectric Printhead
Piezo printheads rely on the piezoelectric effect. An electrical charge is applied to crystals inside the printhead, causing them to deform and create pressure, forcing ink through the nozzle. Brands such as Epson, Konica, and Kyocera use piezo print heads in their inkjet printers.
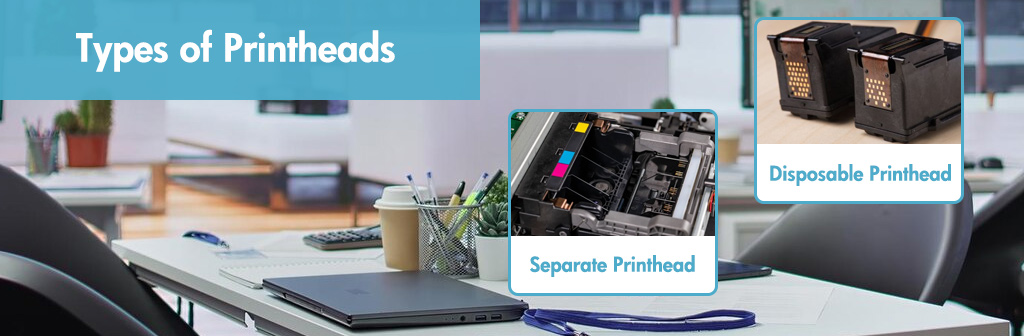
2. According to the Location of the Printhead:
1. Disposable Printhead
It is often seen in consumer-level inkjet printers. This type of printhead is integrated with the ink cartridge and is part of the ink cartridge. When you replace the ink cartridge, the printhead is also replaced. Examples include HP 62XL, HP 63XL, HP 67, Canon 243, Canon 245 246, and Canon 275XL 276XL ink cartridges, etc.
2. Separate Printhead
Unlike disposable printheads, separate printheads are built into the printer. When you replace the ink cartridge, you don’t need to replace the printhead. This type of printhead is typically found in high-end printers from brands like HP, Canon, and Epson.
Some of these printheads can be removed for cleaning or replacement, while others cannot. When the ink cartridge is combined with them, they work together to eject ink. Examples include HP 902, HP 952, Canon 250 251, Canon 280 281, Epson 232, and Epson 822XL.
III. How Do I Know If My Printer Needs a New Printhead?
When these printing problems occur, your printer head may have a problem: blur, smudges, streaks, uneven colors, and missing content. Additionally, your print screen may display an error message “Clean Printhead,” “Printhead Problem,” “Missing or Failed Printhead,” “Possible Printhead Problem,” and so on.
When any of these signs appear, you should check the printhead. If the printhead cannot be cleaned or is severely damaged, you will need to replace it with a new one.
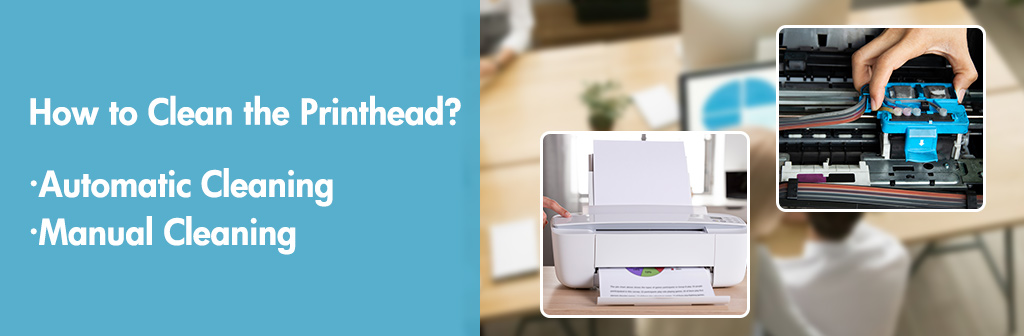
IV. How to Clean the Printhead (For Any Brand)?
There are many reasons why a printhead can become clogged. If the printer has not been used for a while, the ink can dry in the nozzles, causing a clog. Also, using low-quality ink cartridges or using the inkjet printer too frequently can cause ink debris to build up and prevent ink flow. Finally, a clogged printhead can cause the printing problems or error messages mentioned earlier. Don’t worry; you can fix these by cleaning the printhead.
Before you start cleaning, make sure you have new ink cartridges ready, as cleaning consumes a lot of ink. It’s also a good idea to have some paper on hand for test printing after cleaning.
There are two main ways to clean the printhead: automatic cleaning and manual cleaning. If automatic cleaning doesn’t solve the problem, manual cleaning is necessary.
1. Automatic Cleaning
Many printers come with an automatic cleaning feature that can be operated through a computer or directly from the printer itself.
(1) To Clean the Printhead on Your Computer:
For Windows:
- Open the Control Panel and go to “View devices and printers.”
- Right-click your printer and select “Printing preferences.”
- Go to the “Maintenance” tab and choose “cleaning”/ “Print Head Cleaning”/ “Head Cleaning.”
- Once the cleaning is complete, run a “Nozzle Check” to evaluate the results. If the test print looks good, you’re done. If not, repeat the cleaning.
For Mac:
- Open “System Preferences” and select “Printers & Scanners.”
- Click on your printer and choose “Options & Supplies.”
- Click the “Utility” tab, then select “Clean Print Heads.”
- After cleaning, run a nozzle check to verify the results.
(2) To Clean the Printhead on Your Printer:
Most printers with a screen have the option to clean the printhead from the printer panel.
- For HP Printers: Go to “Setup,” select “Printer Maintenance.” and choose “Clean Printhead.” e.g., HP OfficeJet Pro 6960/6968/6978.
- For Canon Printers: Select “Setup” and choose “Maintenance,” then “Cleaning,” e.g., Canon PIXMA TR150/MX722/MX922.
- For Epson Printers: Open “Setup,” choose “Maintenance,” and select “Head Cleaning,” e.g., Epson EcoTank ET-2850/ET-4850/ET-15000.
- For Brother Printers: Go to “Settings” and select “Maintenance,” choose “Print Head Cleaning,” e.g., Brother MFC-J690DW. For models like Brother MFC-J1010DW, and MFC-J1170DW, you can do it following these steps: choose “Ink,” then choose “Print Head Cleaning.” See our blog How to Clean Brother Printer Heads for more information.
After cleaning, print a nozzle check pattern to make sure the problem is resolved. If the problem persists, repeat the cleaning process.
Alternatively, for any brand of printer, you can also go to “Nozzle Check” to check the nozzle check pattern first, then select “clean” to clean the printhead. Read the blog How to Run a Nozzle Check on Epson Printer to learn more.
2. Manual Cleaning
If automatic cleaning does not resolve the problem, you may need to clean it manually. Here’s how to clean the printhead manually:
(1) For Disposable Printhead:
- Prepare two thicker paper towels and some warm water.
- Wet one paper towel with warm water, but not completely soaked.
- Place the print head of your ink cartridge face down on the paper towel and gently wipe it 7-8 times to remove the dried ink.
- Then, place the print head of the ink cartridge face down on the dry paper towel for 3 minutes and wait for the ink to flow out of the cartridge.
- Finally, reinstall the cartridges and run a nozzle check.
(2) For Separate Printhead:
① If you can remove the printhead:
- First, remove the ink cartridge, gently wipe the metal contacts of the ink cartridge with a lint-free cloth, place it facing up, and then remove the printhead.
- Pour some warm water into a container, making sure it completely submerges the nozzles at the bottom of the printhead.
- Then, place the printhead in the water and soak it for 15 minutes.
- After that, wipe the printhead, put it and the ink cartridges back into your printer, and print the nozzle check pattern to see if cleaning has made any difference.
- If the printing effect is still not good, soak the print head again.
The following video also provides a good way to clean the print head:
② If the printhead cannot be removed:
- Prepare a cleaning kit, including a syringe and cleaning solution.
- First, remove the ink cartridge, gently wipe the metal contacts of the ink cartridge with a lint-free cloth, and place it face up.
- Then, move the Ink holder to the center and place a few thick paper towels under the ink holder to absorb the liquid that spills during the cleaning process.
- Put the hose on the syringe, absorb some cleaning liquid, and inject the liquid into the nozzle in the color slot. The dry ink and cleaning liquid will be pushed out.
- Then, wipe the spilled liquid in the color slot and remove the paper towel at the bottom of the ink holder.
- Finally, install the ink cartridge back and print the nozzle check pattern to see if cleaning improves the printing effect.
This video provides detailed instructions for cleaning the non-removable printhead.
If both automatic and manual cleaning fails, you might need to replace the ink cartridge or consult a qualified technician.
V. Frequently Asked Questions About Printheads
1. Is It Worth Replacing Printhead?
It depends on the price of the print head. Replacing a printhead can be expensive, especially for high-end printers. In many cases, if a printhead is damaged beyond repair, it may be more cost-effective to replace the entire printer. However, if your printer is relatively new or well-maintained, replacing the printhead can restore its functionality and improve print quality.
2. How to Prevent the Printhead from Clogging?
To prevent clogging, it’s a good idea to print at least one or two pages per week. Also, if you don’t use your printer often, you may want to run a maintenance cycle to help the ink flow. Many printers have a maintenance mode that can be activated to prevent ink from drying up in the nozzles.
VI. Wrap It Up
The printer head is an important part of your printer’s functionality. When your print head becomes clogged, you can clean it automatically or manually. If you experience ongoing problems, you may need to replace the printhead or consult a professional.