How to Setup Canon PIXMA Printer?
Canon PIXMA printers are a popular choice for home and office users. They’re compact, versatile, and deliver high-quality prints, whether you’re printing documents, graphics, or photos. But no matter how impressive a printer is, it won’t work properly if it’s not set up correctly. Many new users struggle with the first steps—whether to use a USB cable, connect via WiFi, or download the appropriate driver. This blog will walk you through setting up your Canon PIXMA printer. By the end, you’ll be confident that your PIXMA is fully configured and ready to go.
In This Article
Quick Guide: What Does “Setup” Mean?
The key to setting up a Canon PIXMA printer is getting it to communicate with your device (PC, laptop, or mobile device).
On the printer side, you’ll need to turn it on, install the ink cartridges, and load paper.
On the device side, you’ll need to install the Canon driver or the Canon PRINT app.
Then, you’ll need to select a connection method, such as USB cable, WiFi, or WPS, to connect your device to the printer.
Once the connection is established, your device will recognize the printer, and you can start printing.
How to Setup a Canon PIXMA Printer?
Step 1: Unbox and Prepare Your Printer
1. First, Carefully Unpack Your PIXMA Printer.
Canon printer packaging comes with protective materials such as plastic film, tape, and cardboard inserts. Remove all of these protective materials before plugging in any power source. Your printer might have an orange safety clip or foam block inside to keep the printhead safe during shipping. Don’t forget to remove it.
2. Then, Place Your Printer and Plug It In.
It should be placed on a flat, stable surface near a power outlet. If you plan to use a wired connection, it should be near a computer. Turn on the printer, and your PIXMA will guide you through a quick startup process on the display. If your computer does not have a screen, follow the included User Guide / Setup Manual to complete the quick startup.
3. Next, It’s Time to Install the Ink Cartridges.
Open the front or top cover (depending on your model) and wait for the ink cartridge holder to move into place. Remove the ink cartridge from its packaging, remove the protective tape, and insert it into the correct slot. You should hear a click when it’s properly installed. See more in the blog post How to Change Ink on Canon PIXMA.
4. Finally, Place the Paper in the Paper Tray.
Load some paper into the tray. Adjust the paper guides so that they fit snugly, but not too tightly. At this point, your printer is ready, and you can proceed with the software. Refer to the blog How to Load Paper in an HP Printer.
Step 2: Install Canon Drivers and Software
You need drivers for your computer or phone to communicate with the printer. There are two main ways to install Canon drivers:
1. Using the CD (If Provided)
Some Canon PIXMA printers come with an installation CD. If your computer has a CD/DVD drive, simply insert the disc and follow the on-screen instructions to install the driver in minutes.
2. Downloading from the Canon Website
Most modern laptops don’t have a CD drive, so a better option is to visit the Canon support website.
Enter your printer model (for example, PIXMA MG2522, MG3520, MG3600, MG3620, MX490, MX492, TS3522, TS3722, or G7020). Then, under “Software & Drivers,” download the recommended driver package for your operating system (Windows or macOS).
After the download is complete, run the installation file. The installation wizard will guide you through the process. It will ask you to select your preferred connection method—USB or WiFi. See the next section, Step 3: Choose a Connection Method. Don’t worry; you can always change it later if needed. Installing this software also gives you access to helpful tools like Canon’s printer management utility and ink monitoring features.
After completing this step, your computer will be able to recognize the Canon PIXMA printer.
Step 3: Choose a Connection Method
Different users prefer different ways to connect to their printers, and the Canon PIXMA supports a variety of these. Let’s look at each one.
1. USB Connection (Wired Setup)
A USB connection is the most direct method. It’s reliable and doesn’t rely on WiFi, making it ideal if you’ll only be using your printer with 1 computer. This method is fast and doesn’t require WiFi, making it ideal for those who just want a hassle-free setup.
- Plug the USB cable (usually included in the box) into your PIXMA printer, then connect it to your computer.
- If you’ve already installed the driver, your computer should automatically detect the printer and set it up.
- In Windows, go to “Settings,” “Devices,” “Printers & scanners”, and check if your Canon PIXMA appears in the list.
- On a Mac, open “System Preferences,” “Printers & Scanners,” and confirm that the printer has been added.
- Once the printer appears in the list, you can start printing.
2. Wireless (Wi-Fi) Setup
WiFi setup is the most popular option because it allows you to print from multiple devices without cables. Once connected, any computer, laptop, or phone on the same WiFi network can use the printer. The blog post How to Connect Canon PIXMA Printer to WiFi provides detailed connection procedures.
① On the PIXMA Printer:
On the printer display, go to “Network Settings” or “WiFi Setup.” Select your WiFi network name (SSID) from the list and enter your WiFi password. Your Canon PIXMA printer will display “Connected” to confirm it is ready.
For PIXMA printers without a screen, most models require Wi-Fi configuration using WPS (if supported by the router) or the Canon PRINT app on a computer/phone.
② On the Device: Connect Canon PIXMA Printer to Laptop/Computer
Install and open the driver on your computer. During setup, select “Wireless Connection.” The software will search your network and automatically detect the printer.
Printer → Windows:
- Open “Settings,” “Devices,” then “Printers & Scanners.”
- Click “Add a printer or scanner.”
- Select your Canon PIXMA from the list.
- Follow any on-screen instructions to complete setup.
Printer → Mac:
- Go to “System Preferences,” then choose “Printers & Scanners.”
- Click the + button.
- Choose your Canon PIXMA from the available printers.
- Confirm by clicking “Add.”
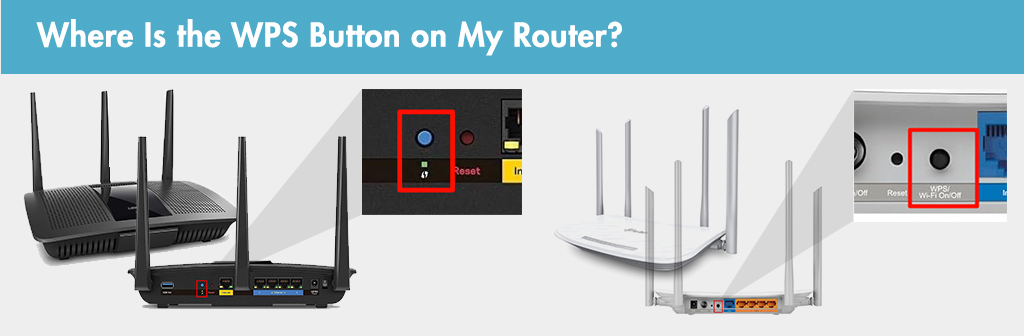
3. WPS One-Touch Setup
WPS eliminates the need to enter lengthy WiFi passwords. If your router supports WPS (WiFi Protected Setup), connecting to a Canon PIXMA printer is much easier. It’s a lifesaver for those who don’t want to deal with complex network settings.
This method works on Canon PIXMA printers without a screen.
- Press the WPS button on your router.
- Within two minutes, press the WPS button on the printer or select “WPS Setup” from the network menu.
- The device will automatically connect.
The blog post How to Connect Epson Printer to WiFi provides more information about WPS.
4. Mobile Setup: Connect Canon PIXMA to Phone
Canon also allows you to print directly from your smartphone or tablet. Simply install the Canon PRINT Inkjet/SELPHY app, which is available for both iOS and Android.
Printer → iPhone
- Download the Canon PRINT app from the App Store.
- Make sure your iPhone and printer are on the same WiFi network.
- Open the app, tap “Add Printer,” and follow the prompts.
- Once connected, you can print photos, documents, or even scan directly from your iPhone.
Printer → Android
- Download the Canon PRINT app from the Google Play Store.
- Confirm that your Android phone and the printer share the same Wi-Fi.
- Open the app, select “Add Printer,” and it will automatically search for nearby devices.
- Once added, you’re ready to print wirelessly.
You can refer to this video to complete the detailed operations.
Step 4: Test Your PIXMA Printer
After completing all connections, you’ll need to ensure your Canon PIXMA printer is functioning properly. Therefore, performing a test print is essential. This test ensures that the ink cartridges are aligned, the paper is feeding correctly, and that the printer is recognized by your computer or phone.
- On your computer, access the printer settings menu.
- Select “Print Test Page” (Windows) or “Print Test Page/Utility” (Mac).
- If using a phone, open the Canon PRINT app and print a simple document or photo.
If the test page prints successfully, you’re good to go. If the print fails, double-check the connections, ensure the driver is installed correctly, and confirm that the printer has enough ink and paper.
FAQs About Canon PIXMA Printer Setup
1. Why won’t my Canon PIXMA printer connect to Wi-Fi?
There are several reasons why your Canon PIXMA may not be able to connect to Wi-Fi.
First, double-check that the WiFi password you entered is correct.
Second, make sure your printer and router are within range; a weak signal may cause setup to fail.
Third, make sure your router isn’t using a hidden SSID or special security settings that block new devices from connecting.
If all else fails, restart your PIXMA and router and try again. Alternatively, try another connection method such as USB or WPS.
2. How to setup a Canon PIXMA MG2522 printer without CD?
The Canon PIXMA MG2522 can be set up without a CD. Simply visit the Canon support website, search for your model, and download the latest driver for your operating system.
After downloading, run the installer and follow the prompts to complete the setup.
You can then connect the printer via USB or WiFi (if supported).
This method is actually better than using a CD because the latest software is always available on the website.
Conclusion
The key to setting up a Canon PIXMA printer lies in preparing the printer and then establishing the correct connection with your device. Follow the steps in this guide, and your Canon PIXMA will be running smoothly in no time. If you encounter any problems, remember that most can be resolved with simple fixes, such as re-entering your password or reinstalling the driver. Once your PIXMA printer is set up, you can enjoy seamless printing for everything from schoolwork to business documents to family photos.
Discover More: Blogs You Might Love